Translate into your own language

Monday, May 30, 2016

Step by step - How to install OEM 12c in Linux x86_64

STEP 1- Create a database that will be used as repository database. Here I have created a database OEMDB in RAC. So it has two instances OEMDB1 and OEMDB2. Unlock the sysman user and keep the password of your choice.


STEP 2 - Downlaod the Enterprise Manager Cloud Control 12c Release 1 (12.1.0.5) (x86_64) software from oracle.

STEP 3 - If you have performed a default database installation you will need to deconfigure Enterprise Manager Database Control. Run the following command as the "oracle" user.


STEP 4 - Make the following initialization parameter changes and restart the database.


STEP 5 - Make a directory to hold the Middleware installation and for Agent. Copy the downloaded zipped file to the server and Unzip the Cloud Control media, then start the installation by running the "runInstller" script.


STEP 6 - If you wish to receive support information, enter the required details, or uncheck the security updates checkbox and click the "Next" button. Click the "Yes" button the subsequent warning dialog.


STEP 7 - If you wish to check for updates, enter the required details, or check the "Skip" option and click the "Next" button.


STEP 8 - If you have performed the prerequisites as
described, the installation on linux x86_64 should pass all prerequisite checks. On linux x86_64 there is one failure due "ulimit".This can be ignored by pressing the "Ignore" button, followed by the "Next" button.


STEP 9 - Select the "Create a new Enterprise Manager System" and "Simple" options, enter the middleware home and click the "Next" button.


STEP 10 - Enter the administrator password and database repository details, then click the "Next" button.


STEP 11 -  Ignore the error by clicking "yes" button


STEP 12 - If you are happy with the review information, click the "Install" button.


STEP 13 -  Wait while the installation and configuration take place.


STEP 14 - When prompted, run the root scripts, then click the "OK" button.


STEP 15 - Make note of the URLs, then click the "Close" button to exit the installer. A copy of this information is available in the "/u01/app/oracle/Middleware/oms/install/setupinfo.txt" file.

Tuesday, May 24, 2016

What is Virtual IP and how it works in Oracle RAC

In real application Cluster environment set up following are the IPs required per Node.

1. Private IP: This IP is used for Node interconnection. Systems can't be access using this IP from outer world.

2. Public IP: This IP is to used for accessing system for day to day tasks monitoring etc.

3. Virtual IP (VIP): This IP is required for fail over in case of Node is down. This will move to surviving node.

In Database Management Software Oracle 11g R2, One more concept is introduced Single Client Access Name (SCAN). Whole Real Application Cluster has given a name called SCAN name. This
is basically a name corresponds to minimum one or recommended three IP's. These IP's are called SCAN VIP's.

Let's see how VIP works 

Suppose, we have a two node Real Application Cluster set up with following IP's

NODE              Static IP address                     Virtual IP address
=======================================================================
racnode1            192.168.1.100                         192.168.1.200
                               (racnode1)                           (racnode1_vip1)

racnode2           192.168.1.101                          192.168.1.201
                              (racnode2)                            (racnode2_vip2)

In Database Management Software Oracle 10g:

Let's first see how this works in Oracle 10g. Suppose, Listener.ora of both Database is using Static IP for it's configuration like

LISTENER=
  (DESCRIPTION=
    (ADDRESS_LIST=
      (ADDRESS=(PROTOCOL=tcp)(HOST=racnode1)(PORT=1521))
      (ADDRESS=(PROTOCOL=ipc)(KEY=extproc))))
SID_LIST_LISTENER=
  (SID_LIST=
    (SID_DESC=
      (GLOBAL_DBNAME=sales.us.example.com)
      (ORACLE_HOME=/oracle10g)
      (SID_NAME=Service1))
    (SID_DESC=
      (SID_NAME=plsextproc)
      (ORACLE_HOME=/oracle10g)
      (PROGRAM=extproc)))

Hence, Tnsnames.ora for Client system will be like

Service1 =
(DESCRIPTION =
  (ADDRESS=(PROTOCOL=TCP)(HOST=racnode1)(PORT=1521))
  (ADDRESS=(PROTOCOL=TCP)(HOST=racnode2)(PORT=1521))
    (CONNECT_DATA =
      (SERVICE_NAME = Service1)
     )
  )

Now, A new connection to database will first go to racnode1, if this node is alive and working fine connection will be establish and user can continue work.

What if, racnode1 is not available Even in this case, client tries to establish a connection with the racnode1 Because, it is first in its address list.But since the node(racnode1) is not available, client tries to establish it’s connection with the next available address in the list (i.e racnode2). So, there is a delay to move from one node to other. This is called Connect-Time Failover.

But the Problem is that the TIME (TCP TIMEOUT) it takes to failover, which will be ranging between a few seconds to a few minutes. For a very high critical systems/environments this is not acceptable.

To resolve this problem Oracle introduce Virtual IP (VIP).

Let's see how it works with VIP

Now, Listener.ora of both Database is using VIP for it's configuration like

LISTENER=
  (DESCRIPTION=
    (ADDRESS_LIST=
      (ADDRESS=(PROTOCOL=tcp)(HOST=racnode1_vip1)(PORT=1521))
      (ADDRESS=(PROTOCOL=ipc)(KEY=extproc))))
SID_LIST_LISTENER=
  (SID_LIST=
    (SID_DESC=
      (GLOBAL_DBNAME=sales.us.example.com)
      (ORACLE_HOME=/oracle10g)
      (SID_NAME=Service1))
    (SID_DESC=
      (SID_NAME=plsextproc)
      (ORACLE_HOME=/oracle10g)
      (PROGRAM=extproc)))

Hence, Tnsnames.ora for Client system will be like

Service1 =
(DESCRIPTION =
  (ADDRESS=(PROTOCOL=TCP)(HOST=racnode1_vip1)(PORT=1521))
  (ADDRESS=(PROTOCOL=TCP)(HOST=racnode1_vip2)(PORT=1521))
    (CONNECT_DATA =
      (SERVICE_NAME = Service1)
     )
  )

Now, A new connection to database will first go to racnode1_vip1, if this node is alive and working fine connection will be establish and user can continue work.

What if, racnode1_vip1 is not available Even in this case, client tries to establish a connection with the racnode1_vip1 Because, it is first in its address list. But since the node(racnode1_vip1) is not available, CRS will come in to picture and move the failed node’s VIP to one of the surviving nodes of the cluster.

 Any connection attempts to the failed node by using VIP will be handled by the failed node’s VIP that is currently residing on one of the surviving node.

This (failed node’s VIP) will respond immediately to client by sending an error indicating that there is no listener. Upon receiving the information of no listener,client immediately retry connection using the next IP in the address list. Thus reduces the time to failover.
In Database Management Softwere Oracle 11g2:

When we talk about Oracle 11g, Since, we have SCAN VIP's in Oracle 11g, Following question comes into mind 
 
Do we still need VIP in Oracle 11g ?

 Yes, We still need VIP. VIP still play the same role as it is discussed in case of Database Management Softwere Oracle 10g.

 What is the Difference between SCAN VIP and VIP ?

The IP address corresponding to SCAN NAME are called as SCAN VIP. Which runs on DB nodes as SCAN LISTENERS.

 Let's see how VIP's works in 11g R2.  In Oracle 11g R2, tnsnames.ora will have only one entry that is scan name of the Cluster like.

Service1 =
(DESCRIPTION =
  (ADDRESS=(PROTOCOL=TCP)(HOST=scan_racnode1_vip1)(PORT=1521))
    (CONNECT_DATA =
      (SERVICE_NAME = Service1)
     )
  )

This scan name is resolved by any of the SCAN VIP and every SCAN VIP has a Listener associated with it running on node know as SCAN LISTENER. In below example, There are two SCAN LISTENER's running on odain1 and odain2.

[grid@bin]$ srvctl status scan_listener
SCAN Listener LISTENER_SCAN1 is enabled
SCAN listener LISTENER_SCAN1 is running on node odain1
SCAN Listener LISTENER_SCAN2 is enabled
SCAN listener LISTENER_SCAN2 is running on node odain2

All databases are registered with each SCAN LISTENER in the Cluster and PMON updates it's load to each SCAN LISTENER. Each request go through using SCAN_NAME, resolves to SCAN VIP i.e. SCAN LISTENER. Now, SCAN LISTENER redirects it to VIP by deciding using Load Balance.

SCAN _NAME ===============> SCAN VIP ==============> VIP

How to Troubleshoot ORA-00600 Internal error in Oracle

ORA-00600 and ORA-07445 Troubleshooting are an integral part of Oracle Database Administrator's life. In some cases these error could crash database instance's or in others does very minor impact.

So, I would suggest to start working on ORA-00600 and ORA-07445 immediately, you notice them. My agenda for this post is to explain the approach for solving ORA-00600 and ORA-07445 Internal error, which would be more helpful rather than solving one or two issues.

What is ORA-00600 and ORA-07445 Internal error ?

As we know, basic code of database is written in C and C++ Language. When a function in C call another function but got some unexpected results and which is not handled by Oracle Code, then DBA encounter ORA-00600 or ORA-07445 Internal error. On further discussion in this article, we will also see which function is failed and case these errors.

Troubleshooting ORA-00600 

1. Getting Error Detail from Alter log and Trace file:

Whenever, this error arise, it is written in to database alert log files with trace file having details about this error. So, first task is to find trace file from alter log holding about this error.
Oracle 11g Alter log entry with error ORA-00600 and trace files path

Wed May 25 15:41:47 2016
Errors in file /u01/app/oracle/diag/rdbms/remotedba/remotedba1/trace/remotedba1_pr00_19608.trc (incident=222458):
ORA-00600: internal error code, arguments: [1433], [60], [], [], [], [], [], [], [], [], [], []
Incident details in: /u01/app/oracle/diag/rdbms/remotedba/remotedba1/incident/incdir_222458/remotedba1_pr00_19608_i222458.trc
Use ADRCI or Support Workbench to package the incident.
See Note 411.1 at My Oracle Support for error and packaging details.

In case of Oracle 10g, Just A small difference, Instead of Incident file detail you will see trace file path. Open the trace/incident files and you will find description about this error. Though, it's not very human readable.


2. Login to https://support.oracle.com to Troubleshoot:

If, you need an accurate solution of this error, then you can only find at https://support.oracle.com. So, first of all, you must have an Oracle Support user ID and Password.

Login to support.oracle.com

Search for Article "153788.1" in knowledge base. This will open an article "ORA-600/ORA-7445/ORA-700 Error Look-up Tool [Article ID 153788.1]" This looks like this.


3. Search Error in this tool:

In the above screen choose error code DBA is facing in alter log files (ORA-600 or ORA-7445). Next is filling "Error Code First Argument". Whatever you are getting in fist [] after ORA-600 or ORA 7445 is called as first argument.

E.g. ORA-00600: internal error code, arguments: [1433]

In this error 1433 is the first argument.

You just need to copy first argument in "Error Code First Argument" box. Here, I am taking ORA-00600: internal error code, arguments: [1433] as an test case. Choose Oracle version database is running on from "Oracle RDBMS Version" drop box. Here, I am choosing 11.2.0.3. After filling all this information. Click "Look-up Error". This will search Oracle knowledge base for matching documents.


Document 138413.1 is the matching document with given error in Alert log file. This document has all details about bug, affected versions, workaround or fix for it. Click on the link for the document and see the details.

In this case, below are the details.

    a. Bug number: 12899768

    b. Fixed in versions: 11.2.0.2.8, 11.2.0.2.BP18, 11.2.0.3.BP11, 12.1.0.0

    c. Workaround: Increase _messages init.ora parameter to a large value.

Apply the suggested solution and your problem is solved.

What is OS Watcher and how it works

Oracle OS Watcher (OSWatcher) is a tool to help DBA's to trouble shoot Database performance, Cluster reboot, node eviction, DB server reboot, DB instance Crash related issues and many more.

As we know, OS stats like top, mpstat, netstat plays an important role in Database trouble shooting but there is no way to keep historical date for these stats. Here, OS Watcher is the only rescue for Database Administrator. Suppose Yesterday, There was some performance issue on Database Node but you were not aware about that and when you know that the issue was resolved itself.

Now, DBA can get Database related stats from AWR reports but not OS related stats for last day, To overcome this challenge Oracle introduce OS Watcher utility, which collects OS stats data at a frequency of five minutes and keep it for seven days (default settings). So Now, DBA need not to worry about historical OS stats.

To Trouble shoot Database performance related issues AWR, ADDM and OS Watcher logs are the first place to start for a Remote DBA. Where as for Cluster reboot, node eviction, DB server reboot Alter log files, OS Watcher and System messages (/var/log/messages) plays an important role.

How to Install OS Watcher Utility

1. Download tar file from Oracle Support Article "OSWatcher Black Box.

2. Copy the file oswbb601.tar to the directory where oswbb is to be installed.

3. Extract tar file with “oracle” user
# tar xvf oswbb601.tar

4. Change to oswbb directory created.

5. Start OS Watcher utility using below command.

Example 1:

./startOSW.sh 60 10

This would start the tool and collect data at 60 second intervals and log the last 10 hours of data to archive files.

Example 2:

./startOSW.sh

This would use the default values of 30, 48 and collect data at 30 second intervals and log the last 48 hours of data to archive files.

Example 3:

./startOSW.sh 20 24 gzip

This would start the tool and collect data at 20 second intervals and log the last 24 hours of data to archive files. Each file would be compressed by running the gzip utility after creation.

STOPPING OSW:

To stop the OSW utility execute the stopOSW.sh command. This terminates all the processes associated with the tool.

Example:

./stopOSW.sh

The default location of OS Watcher files is /opt/oracle.oswatcher/osw/archive. To collect OS Watcher files for a particular day use below command.

# cd /opt/oracle.oswatcher/osw/archive

# find . -name '*25.05.16*' -print -exec zip /tmp/osw_`hostname`.zip {} \;
{where 16- year 05- Month 25-day}

Below are the list of sub folders created under archive folder

-bash-4.1$ ls

osw_ib_diagnostics   oswiostat            oswnetstat           oswps                oswvmstat
osw_rds_diagnostics  oswmpstat            oswprvtnet           oswtop

Monday, May 16, 2016

How to monitor LONG RUNNING SQL statements in ORACLE

Suppose you have a SQL statement that runs a long time, and you want to be able to monitor the progress of the statement and find out when it will finish.

By viewing information for a long-running query in the V$SESSION_LONGOPS data dictionary view, you can gauge about when a query will finish. Let’s say you are running the following query, with join conditions, against a large table:

SELECT last_name, first_name FROM employees_big
WHERE last_name = 'EVANS';

With a simple query against the V$SESSION_LONGOPS view, you can quickly get an idea of how long the query will execute, and when it will finish:

SELECT username, target, sofar blocks_read, totalwork total_blocks,
round(time_remaining/60) minutes
FROM v$session_longops
WHERE sofar <> totalwork
and username = 'HR';

USERNAME   TARGET                                   BLOCKS_READ   TOTAL_BLOCKS MINUTES
----------------- -----------------------------             ----------------------  ----------------------- --------------
HR                   HR.EMPLOYEES_BIG                   81101                     2353488                 10

As the query progresses, you can see the BLOCKS_READ column increase, as well as the MINUTES column decrease. It is usually necessary to place the WHERE clause to eliminate rows that have been completed, which is why in the foregoing query it asked for rows where the SOFAR column did not equal TOTALWORK.

How It Works

In order to be able to monitor a query within the V$SESSION_LONGOPS view, the following requirements apply:

  • The query must run for six seconds or greater.
  • The table being accessed must be greater than 10,000 database blocks.
  • TIMED_STATISTICS must be set or SQL_TRACE must be turned on.
  • The objects within the query must have been analyzed via DBMS_STATS or ANALYZE.

This view can contain information on SELECT statements, DML statements such as UPDATE, as well as DDL statements such as CREATE INDEX. Some common operations that find themselves in the V$SESSION_LONGOPS view include table scans, index scans, join operations, parallel operations, RMAN backup operations, sort operations, and Data Pump operations.

Step By Step - Reading and Understanding of EXECUTION PLAN in ORACLE

The execution plan for a SQL operation tells you step-by-step exactly how the Oracle optimizer will execute your SQL operation. Using AUTOTRACE, let’s get an explain plan for the following query:


Once you have an explain plan to interpret, you can tell which steps are executed first because the innermost or most indented steps are executed first, and are executed from the inside out, in top-down order. In the foregoing query, we are joining the EMP and DEPT tables. Here are the steps of how the query is processed based on the execution plan:

1. The PK_DEPT index is scanned (ID 3).

2. All EMP table rows are scanned (ID 5).

3. Rows are retrieved from the DEPT table based on the matching entries in the
    PK_DEPT index (ID 2).

4. Resulting data from the EMP table is sorted (ID 4).

5. Data from the EMP and DEPT tables are then joined via a MERGE JOIN (ID 1).

6. The resulting data from the query is returned to the user (ID 0).
 
How It Works

When first looking at an explain plan and wanting to quickly get an idea of the steps in which the query will be executed, do the following:

1. Look for the most indented rows in the plan (the right-most rows). These will
be executed first.

2. If multiple rows are at the same level of indentation, they will be executed in
top-down fashion in the plan, with the highest rows in the plan first moving downward in the plan.

3. Look at the next most indented row or rows and continue working your way
outward.

4. The top of the explain plan corresponds with the least indented or left-most
part of the plan, and usually is where the results are returned to the user.
Once you have an explain plan for a query, and can understand the sequence of how the query will be processed, you then can move on and perform some analysis to determine if the explain plan you are looking at is efficient. When looking at your explain plan, answer these questions and consider these factors when determining if you have an efficient plan:


  • What is the access path for the query (is the query performing a full table scan or is the query using an index)?
  • What is the join method for the query (if a join condition is present)?
  • Look at the columns within the filtering criteria found within the WHERE clause of the query, and determine if they are indexed.
  • Get the volume or number of rows for each table in the query. Are the tables small, medium-sized, or large? This may help you determine the most appropriate join method. 
  • When were statistics last gathered for the objects involved in the query?
  • Look at the COST column of the explain plan to get a starting cost.


By looking at our original explain plan, we determined that the EMP table is larger in size, and also that there is no index present on the DEPTNO column, which is used within a join condition between the DEPT and EMP tables. By placing an index on the DEPTNO column on the EMP table and gathering statistics on the EMP table, the plan now uses an index:


Working with DBMS_XPLAN to display the EXPLAIN PLAN of a query

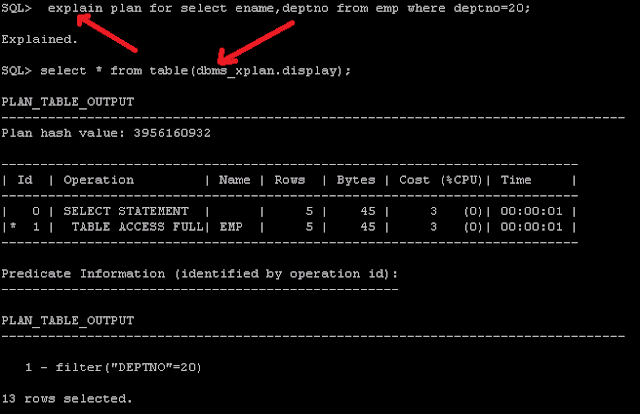
The Oracle-provided PL/SQL package DBMS_XPLAN has extensive functionality to get explain plan information for a given query. There are many functions within the DBMS_XPLAN package. The DISPLAY function can be used to quickly get the execution plan for a query, and also to customize the information that is presented to meet your specific needs. The following is an example that invokes the basic display functionality:


The DBMS_XPLAN.DISPLAY procedure is very flexible in configuring how you would like to see output. If you wanted to see only the most basic execution plan output, using the foregoing query, you could configure the DBMS_XPLAN.DISPLAY function to get that output:


How It Works

The DBMS_XPLAN.DISPLAY function has a lot of built-in functionality to provide customized output based on your needs. The function provides four basic levels of output detail:


  • BASIC
  • TYPICAL (default)
  • SERIAL
  • ALL


If you simply want the default output format, there is no need to pass in any special format options:

SELECT * FROM table(dbms_xplan.display);

If you want to get all available output for a query, use the ALL level of detail format output option:

SELECT * FROM table(dbms_xplan.display(null,null,'ALL'));

Generating EXECUTION PLAN of a SQL query using AUTOTRACE

Suppose you are tuning a sql query and want to quickly generate an execution plan from SQL Plus for a query.

Here is the solution:

From SQL Plus, you can use the AUTOTRACE feature to quickly generate the execution plan for a query. This SQL Plus utility is very handy at getting the execution plan, along with getting statistics for the query’s execution plan. In the most basic form, to enable AUTOTRACE within your session, execute following command within SQL Plus:


How It Works

There are several options to choose from when using AUTOTRACE, and the basic factors are as follows:

1. Do you want to execute the query?

2. Do you want to see the execution plan for the query?

3. Do you want to see the execution statistics for the query?

As you can see from the below table, you can achieve all the above mentioned 3 aspects. The portions of the words in brackets are optional.


The most common use for AUTOTRACE is to get the execution plan for the query, without running the query. By doing this, you can quickly see whether you have a reasonable execution plan, and can do this without having to execute the query.

Run a simple query to test this:


If you want to see only execution statistics. use statistics with autotrace command.
run a simple query to test this:


Once you are done using AUTOTRACE for a given session and want to turn it off and run other querieswithout using AUTOTRACE, run the following command from within your SQL Plus session:

SQL> set autotrace off

The default for each SQL Plus session is AUTOTRACE OFF, but if you want to check to see what your current AUTOTRACE setting is for a given session, you can do that by executing the following command:

SQL> show autotrace
autotrace OFF

Thursday, May 12, 2016

What is DEAD LOCK in ORACLE and how to resolve it

We regularly get complains from application user that database connection is very slow.

There could be many reasons for this but most of the time it is due to deadlock.
So here I would be explaining what is deadlock and how to resolve it.

The Application Deadlock is not reported in to Database Alert log files, Which makes this more difficult to resolve. The approach used in this post is general method for resolving slow database session So, A DBA can also use this approach for other Slow User session performance issues.

What is Deadlock ?

Suppose there are two friends A and B. A has an apple and want a mango and B has a mango and wants apply and none of them is ready to leave what they have and want what other have. Now, this is called as Deadlock. Same happens in case of Database Sessions, One session holds lock on an row and want to another one which is hold by second one and both need others rows which cause a deadlock.

Steps to Reproduce Deadlock:

I opened two database session from same database user scott and update same row in both sessions without commit and generate a dead lock situation

from session 1:


from session 2:


Above update statement is hang and not responding has generated a Deadlock. DBA cross check alert log file of database which is not showing any error message like 'ORA-0060 Deadlock Detected'

1. Find Deadlock Session:


Here from BLOCKING_INSTANCE and BLOCKING_SESSION values, this is clear that sid 136 (Session #2) is blocked by an Instance number 1 and session number 54. let's find out in what both blocking and blocked session are executing.

2. Blocked Session Detail:

Using below command find what query is getting executed by sid 47 (get SQL_ID from above commnd).


Database Administrator finds This session (Blocked Session) is executing an update statement on dept table.

3. Blocking session detail:

Let' find what blocking session is doing using below command


Final Solution:

DBA has to ask either kill the blocked session or ask user to either commit or terminate his session. I execute commit in session 1 and it automatically release locks and session 2 also got his row updated.

Wednesday, May 11, 2016

Step by step - How to Analyze AWR Report in Oracle

As you have Generated AWR Report in Oracle, Next task is to Analyze AWR Report in Oracle. By Reading AWR Report  you can easily solve issues like Slow database, high wait events, Slow query and many more. Though It's a lengthy report but Analyzing or Reading relevant part of AWR Report can help to troubleshoot issues in easy and fast manner.

AWR stands for Automatically workload repository, Though there could be many types of database performance issues, but when whole database is slow, then there are two possibilities.

1. Issue with Database Machine. OS Watcher is the best tool to start.

2. If Database performance issue, Then AWR Report is the place to look at.

In case if a particular query is not performing well, i would suggest to look at execution plan of the query, stats of underlying table etc. In this case AWR won't help much.

Recommendations before getting an AWR Report.

1. Collect Multiple AWR Reports: It's always good to have two AWR Reports, one for good time (when database was performing well), second when performance is poor. This way Remote DBA can easily compare good and bad report to find out the culprit.

2. Stick to Particular Time: "Database is performing slow" will not help anymore to resolve performace issues. We have to have a specific time like Database was slow yesterday at 1 Pm and continue till 4Pm. Here, DBA will get a report for these three hours.

3. Split Large AWR Report into Smaller Reports: Instead of having one report for long time like one report for 4hrs. it's is better to have four reports each for one hour. This will help to isolate the problem.

In case of RAC env. generate one report for each instance. Once, you have generated AWR report. Now, it's time of analyze the report. Since, AWR report is a huge report and area to look into AWR is also depends on problem to problem. Here, I am listing most common area for a DBA to look into which will give a clear picture of the issue.

Steps to Analyze AWR Report

1. Report Header

Database Details:

After getting an AWR Report This is first and Top part of the report. In this part cross check for database and instance and and database version with the Database having performance issue.This report also show RAC=YES if it's an RAC database.

Host Configuration:

This will give you name, platform CUP, socket and RAM etc. Important thing to notice is number of cores into the system. In this example there are 12 CUP's in Cores.

Snap Shot Detail:

This are the detail about snap shot taken, Snap start time and end time. Difference between them is as "Elapsed". Here is a new term "DB Time"

DB Time= session time spent in database.
DB Time= CPU Time + Non IDLE wait time.
You can find, DB time is very large as compared to Elapse time, which is not a concern. Check if you have taken a report for the time having performance problem. If yes fine, other wise take a report for performance problem time.

Next is Cache Sizes, which is just detail about SGA components.

2. Load Profile:

Here are few important stats for a DBA to look into. Fist is "DB CPU(s)" per second. Before that let's understand how DB CUP's work. Suppose you have 12 cores into the system. So, per wall clock second you have 12 seconds to work on CPU.


So, if "DB CPU(s)" per second in this report > cores in (Host Configuration (#2)).
means env is CPU bound and either need more CPU's or need to further check is this happening all the time or just for a fraction of time. As per my experience there are very few cases, when system is CPU bound.

In this case, machine has 12 cores and DB CPU(s) per second is 6.8. So, this is not a CPU bound case.

Next stat to look at are Parses and Hard parses. If the ratio of hard parse to parse is high, this means Database is performing more hard parse. So, needs to look at parameters like cursor_sharing and application level for bind variables etc.

DB Time(s):
Its the amount of time oracle has spent performing database user calls. Note it does not include background processes.
DB CPU(s):
Its the amount of CPU time spent on user calls. Same as DB time it does not include background process. The value is in microseconds
Redo size:
 For example, the table below shows that an average transaction generates about 19,000 of redo data along with around 48,000 redo per second.
Logical reads:
Consistent Gets+ DB blocks Gets = Logical reads
Block Changes:
The number of block modified during the sample interval
Physical reads:
No of block request causing I/O operation
Physical writes:
Number of physical writes performed
User calls:
Number of user queries generated
Parses:
The total of all parses; both hard and soft.
Hard Parses:
The parses requiring a completely new parse of the SQL statement. These consume both latches and shared pool area.
Soft Parses:
Soft parses are not listed but derived by subtracting the hard parses from parses. A soft parse reuses a previous hard parse; hence it consumes far fewer resources.
Sorts:
No of sorts performed
Logons:
No of logons during the interval
Executes:
No of SQL Executes
Transactions:
No of transactions per second

The load profile provides an at-a-glance look at some specific operational statistics. You can compare these statistics with a baseline snapshot report to determine if database activity is different. Values for these statistics are presented in two formats. The first is the value per second (for example, how much redo was generated per second) and the second is the value per transaction (for example, 1,024 bytes of redo were generated per transaction).
Statistics presented in the load profile include such things as:
Redo size - An indication of the amount of DML activity the database is experiencing.

Logical and physical reads - A measure of how many IO's (Physical and logical) that the database is performing.

User calls - Indicates how many user calls have occurred during the snapshot period. This value can give you some indication if usage has increased.

Parses and hard parses - Provides an indication of the efficiency of SQL re-usage.

Sorts - This number gives you an indication of how much sorting is occurring in the database.

Logons - Indicates how many logons occurred during the snapshot period.

Executes - Indicates how many SQL statements were executed during the snapshot period.

Transactions - Indicates how many transactions occurred during the snapshot period.
Additionally, the load profile section provides the percentage of blocks that were changed per read, the percentage of recursive calls that occurred, the percentage of transactions that were rolled back and the number of rows sorted per sort operation.

3. Instance Efficiency Percentages:

In these statistics, you have to look at "% Non-Parse CPU". If this value is near 100% means most of the CPU resources are used into operations other than parsing, which is good for database health.


Execute to Parse % and Parse CPU to Parse Elapsd %:

If the the value are low like in the above case of 3.40 and 0.01 means that there could be a parsing problem. You may need to look at bind variable issues or shared pool sizing issue.

Redo NoWait%:

Usually this stats is 99 or greater

In-memory Sort %:

This can tell you how efficient is you sort_area_size, hash_area_size or pga_aggrigate_target are. If you dont have adequate sizes of sort,hash and pga parameters, then you in-memory sort per cent will go down

Soft parse %:

with 98.20 % for the soft parse meaning that about 1.72 % (100 -soft parse) is happening for hard parsing. You might want to look at you bind variables issues.

Latch Hit %:
should be close to 100.

% Non-Parse CPU:

Most of our statements were already parsed so we weren't doing a lot of re parsing. Re parsing is high on CPU and should be avoided.

4. Top 5 Timed Foreground Events:

This is another most important stats to consider while looking at AWR Report for any database performance related issue. This has a list of top 5 foreground wait events.


Here, first of all check for wait class if wait class is  User I/O , System I/O,  Others etc this could be fine but if wait class has value "Concurrency" then there could be some serious problem. Next to look at is Time (s) which show how many times DB was waiting in this class and then Avg Wait (ms). If Time(s) are high but  Avg Wait (ms) is low then you can ignore this. If both are high or Avg Wait (ms) is high then this has to further investigate.

In the above screen shot, most of the resource are taken by DB CPU = 64% DB time. Taking resource by DB CUP is a normal situation.

Let's take an example,  In which event is "log file switch (checkpoint incomplete) " which has high waits, huge Time (s) and large values in Avg Wait (ms) and wait class is configuration. So, here you have to investigate and resolve log file switch (checkpoint incomplete).

This section provides insight into what events the Oracle database is spending most of it's time on (see wait events). Each wait event is listed, along with the number of waits, the time waited (in seconds), the average wait per event (in microseconds) and the associated wait class.

its critical to look into this section. If you turn off the statistic parameter, then the Time(s) wont appear. Wait analysis should be done with respect to Time(s) as there could be million of waits but if that happens for a second or so then who cares. Therefore, time is very important component.

So you have several different types of waits. So you may see the different waits on your AWR report. So lets discuss the most common waits.

df file type waits:

db file sequential read:

Is the wait that comes from the physical side of the database. it related to memory starvation and non selective index use. sequential read is an index read followed by table read because it is doing index lookups which tells exactly which block to go to

db file scattered read:

caused due to full table scans may be because of insufficient indexes or un-avilablity of updated statistics

direct Path writes:

You wont see them unless you are doing some appends or data loads

direct Path reads:

could happen if you are doing a lot of parallel query activity

db file parallel writes / read: 

if you are doing a lot of partition activity then expect to see that wait even. it could be a table or index partition

db file single write:

if you see this event than probably you have a lot of data files in your database.

direct path read temp or direct path write temp:

this wait event shows Temp file activity (sort,hashes,temp tables, bitmap)
check pga parameter or sort area or hash area parameters. You might want to increase them
Host CPU, Instance CPU and Memory Statistics are self explanatory.

5. Time Model Statistics:

This is a detailed explanations of system resource consumptions. Stats are order by Time (s) and % of DB Time.


A noticeable result Sum of all  % of DB time is > 100%. why is this ?
Because this is cumulative time i.e. In this case SQL execute elapsed time is taking 89% of DB time, which includes it sub parts like parse time elapsed, hard parse elapsed time etc. So, if you find Hard parse time elapsed is taking more %. So investigate further so on and so forth.
DBA has to look for stat which is taking abnormal % of DB time.

6. Operating System Statistics - Detail:

This is the information related to OS, what is the load status on System shown here.


This report shows, system is 62 and 70% idle at time of report taken, So, there is no resource crunch at system level. But if, you found very high busy, user or sys % and indeed this will led to low idle %. Investigate what is causing this. OS Watcher is the tool which can help in this direction.
Next, very crucial part of AWR report for a DBA is SQL Statistics. Which has all sql query details executed during report time interval.


We will explore few of them, To understand, how to analyzed these reports. Let's start with

7. SQL Ordered by Elapsed Time:

As explained by name itself, this lists SQL queries ordered by Elapsed time into reported time interval.


In this report, look for query has low executions and high Elapsed time per Exec (s) and this query could be a candidate for troubleshooting or optimizations. In above report, you can see first query has maximum Elapsed time but no execution. So you have to investigate this.
In Important point, if executions is 0, it doesn't means query is not executing, this might be the case when query was still executing and you took AWR report. That's why query completion was not covered in Report.

10. SQL Statistics:


In this report, SQL queries are listed on the basis of CPU taken by the query i.e. queries causing high load on the system. The top few queries could be the candidate query for optimization.


stat, look for queries using highest CPU Times, If a query shows executions 0, this doesn't means query is not executing. It might be same case as in SQL queries ordered by Elapsed time. The query is still executing and you have taken the snapshot.

However, There are so many other stats in AWR Report which a DBA needs to consider, I have listed only ten of them but these are the most commonly used stats for any performance related information.

How to read parallel query's explain plan

When reading your parallel explain plan, interpret it from the innermost to outermost levels, and from the bottom going up. For instance, here again is our parallel execution plan from using a parallel hint against the EMP table:


Looking at the foregoing plan starting at the bottom, we are doing a full table scan of the EMP table. The PX BLOCK INTERATOR just above the table scan is responsible for taking that request for a full table scan, and breaking it up into chunks based on the DOP specified. The PX SEND processes pass the data to the consuming processes. Finally, the PX COORDINATOR is the process used by the query coordinator to receive the data from a given parallel process and return to the SELECT statement.

If you look at the IN-OUT column of your explain plan, you can see the execution flow of the
operation, and determine if there are any bottlenecks, or any parts of the plan that are not parallelized, which may cause a decrease in the expected performance.

How It Works

Below tables describes the fundamental information that can be used to determine the execution plan for a parallel operation. In order to understand the basics of interpreting your explain plan output, you should be aware of two aspects:

  • The possible parallel execution steps in below table 1
  • The parallel operations that occur within each step in below table 2

The execution steps are the aspects of a parallelized plan, while the operations that occur within your parallel execution plan can help you determine if you have an optimized plan, or one that needs tuning and improvement.

As with non-parallel operations, the explain plan utility is a very useful tool in determining what the optimizer is planning to do to complete the task at hand. When executing operations in parallel, there are specific aspects of the explain plan related to parallelism. These are important to understand, so you can determine if the operation is running as optimized as possible. One of the key aspects of analyzing a parallel explain plan is to determine if there are any aspects of the plan that are being run serially, as this bottleneck can reduce the overall performance of a given operation. That it is why it is critical to understand aspects of the explain plan that relate to parallel operations, with the end goal being that all aspects of the operation are parallelized.


How to enable Parallelism for a Specific SQL Query

Problem

You have a slow-running query accessing data from a large table. You want to see if you can speed up the query by instructing Oracle to use multiple processes to retrieve the data.

Solution

There are two distinct types of hints to place in your SQL to try to speed up your query by using multiple processes, or parallelism. One type of hint is for data retrieval itself, and the other is to help speed the process of reading the indexes on a table.

Parallel Hints for Tables

First, you need to determine the degree of parallelism (DOP) desired for the query. This instructs Oracle how many processes it will use to retrieve the data. Second, place a parallel hint inside of the query specifying the table(s) on which to execute parallel SQL, as well the degree of parallelism to use for the query—for example:

SELECT /*+ parallel(emp,4) */ empno, ename
FROM emp;

If you use a table alias in your query, you must use it in your hint, else the Oracle optimizer will ignore the hint.

SELECT/*+ parallel(e,4) */ empno, ename
FROM emp e;


The hints in the preceding two queries result in four processes dividing the work of reading rows from the EMP table. Four processes working together will get the job done faster in terms of wall-clock time than one process doing all the work by itself.

Optionally, you can omit specifying a degree of parallelism within the hint. If you specify only the table name or alias in the hint, Oracle will derive the degree of parallelism based on the database initialization parameters, which may or may not give you the desired degree of parallelism:

SELECT/*+ parallel(e) */ empno, ename
FROM emp e;

Execution plan without use of parallel hint:


How It Works

In order to effectively use parallel hints, you need to take the following items into consideration:


  • The number of tables in your query
  • The size of table(s) in your query
  • The number of CPUs on your system
  • The filtering columns in your WHERE clause
  • What columns are indexed, if any


You also must analyze and understand three key components of your system prior to using parallel hints in queries:


  •  System configuration, such as amount of memory and CPUs, and even disk configuration
  •  Database configuration parameters related to parallelism
  •  The DOP specified on the objects themselves (tables and indexes)


Parallel SQL must be used with caution, as it is common to overuse, and can cause an over utilization of system resources, which ultimately results in slower rather than faster performance.

Overuse is a very common mistake in the use of parallelism. Depending on the number of tables in your query, you may want to place parallelism on one or more of the tables—depending on their size. A general rule of thumb is that if a table contains more than 10 million rows, or is at least 2 gigabytes in size, it may be a viable candidate for using parallelism. The degree of parallelism (DOP) should be directly related to the number of CPUs on your system. If you have a single-CPU system, there is little, if any, benefit of using parallel SQL, and the result could very well be returned slower than if no parallelism was used at all.

Tuesday, May 10, 2016

Basic concept of parallelism in SQL tuning

Parallelism can help improve performance on particular operations simply by assigning multiple resources to a task. Parallelism is best used on systems with multiple CPUs, as the multiple processes used (that is, the parallel processes) will use those extra CPU resources to more quickly complete a given task.

As a general rule, parallelism is also best used on large tables or indexes, and on databases with large volumes of data. It is ideal for use in data warehouse environments, which are large by their nature. Parallelism is not well suited for OLTP environments, just because of the transnational nature of those systems.

In order to use parallelism properly, there are several important factors to understand:


  • The number of CPUs on your system
  •  Proper configuration of the related initialization parameters
  • The key SQL statements that you want to tune for parallelization
  • The degree of parallelism (DOP) configured on your database
  • The actual performance vs. expected performance of targeted SQL operations


One of the most common pitfalls of parallelism is overuse. It is sometimes seen as a magic bullet to tune and speed up SQL operations. In turn, parallelism can actually lead to poorer rather than better performance. Therefore, it is critically important for the DBA to understand the physical configuration of his or her system, and configure parallelism-related parameters to best suit the system. Educating developers and users of your database about basic questions will increase the success rate of parallel operations. When is it appropriate to use parallelism? How do you properly enable parallelism in SQL operations? What type of operations can be parallelized? Parallelism is a powerful tool to aid in drastically improving performance of database operations, but with that power comes responsibility.

How to change join order in SQL using hint

Problem

You have a performance issue with a query where you are joining multiple tables, and the Oracle optimizer is not choosing the join order you desire.

Solution

There are two hints—the ORDERED hint, and the LEADING hint—that can be used to influence the join order used within a query.

Using the ORDERED Hint

You are running a query to join two tables, EMP and DEPT, as you want to get the department names for each employee. By placing an ORDERED hint into the query, you can see how the hint alters the execution access path—for example:


Using the LEADING Hint

As with the example using the ORDERED hint, you have the same control to specify the join order of the query. The difference with the LEADING hint is that you specify the join order from within the hint itself, while with the ORDERED hint, it is specified in the FROM clause of the query. Here’s an example:


From the foregoing query, we can see that the table order specified in the FROM clause is irrelevant, as the order specified in the LEADING hint itself specifies the join order for the query.

How It Works

The main purpose of specifying either of these hints is for multi-table joins where the most optimal join order is known. This is usually known from past experience with a given query, based on the makeup of the data and the tables. In these cases, specifying either of these hints will save the optimizer the time of having to process all of the possible join orders in determining the optimal join order. This can improve query performance, especially as the number of tables to join within a query increases.

When using either of these hints, you instruct the optimizer about the join order of the tables. Because of this, it is critically important that you know that the hint will improve the query’s performance. Oracle recommends, where possible, to use the LEADING hint over the ORDERED hint, as the LEADING hint has more versatility built in. When specifying the ORDERED hint, you specify the join order from the list of tables in the FROM clause, while with the LEADING hint, you specify the join order within the hint itself.


Friday, May 6, 2016

Archived log generation report per hour and day basis

V$ARCHIVED_LOG displays information about the archived logs generated by your database and haven't yet aged out from your control file.

We are going to use this view to generate a report, displaying some useful information about it.
The following query displays per day the volume in MBytes of archived logs generated, deleted and of those that haven't yet been deleted by RMAN.

SELECT SUM_ARCH.DAY,
         SUM_ARCH.GENERATED_MB,
         SUM_ARCH_DEL.DELETED_MB,
         SUM_ARCH.GENERATED_MB - SUM_ARCH_DEL.DELETED_MB "REMAINING_MB"
    FROM (  SELECT TO_CHAR (COMPLETION_TIME, 'DD/MM/YYYY') DAY,
                   SUM (ROUND ( (blocks * block_size) / (1024 * 1024), 2))
                      GENERATED_MB
              FROM V$ARCHIVED_LOG
             WHERE ARCHIVED = 'YES'
          GROUP BY TO_CHAR (COMPLETION_TIME, 'DD/MM/YYYY')) SUM_ARCH,
         (  SELECT TO_CHAR (COMPLETION_TIME, 'DD/MM/YYYY') DAY,
                   SUM (ROUND ( (blocks * block_size) / (1024 * 1024), 2))
                      DELETED_MB
              FROM V$ARCHIVED_LOG
             WHERE ARCHIVED = 'YES' AND DELETED = 'YES'
          GROUP BY TO_CHAR (COMPLETION_TIME, 'DD/MM/YYYY')) SUM_ARCH_DEL
   WHERE SUM_ARCH.DAY = SUM_ARCH_DEL.DAY(+)
ORDER BY TO_DATE (DAY, 'DD/MM/YYYY');


The below script - which will give archive log count - hour-by-hour, daily - for a month: view on ONE Page. This script runs on ORACLE Database Version 8i/9i/10g/11g.

This is a 'SELECT only' QUERY - to be run run as SYSTEM account.

This SQL QUERY finishes in 'few' seconds only (so, no adverse effect on database performance).
For your safety, advisable to run on your Development or Test instance (whichever is running in ARCHIVE MODE) first, before running on Production instance.

This script will generate output file named archive_log_count.html in the current directory (i.e. working directory).
If your Oracle database is running on non-Windows server, you need to transfer (ftp or WinSCP or similar) out-put file archive_log_count.html from non-Windows host to Windows PC and open the file in the web browser.

Best way to run this script is COPY & PASTE blue color text below at your SQL> prompt logged in as 'SYSTEM' account.

set echo off
set feedback off
set termout off
set pause off
set head on
set lines 100
set pages 500
clear columns
clear computes

set markup html on spool on preformat off entmap on -

head ' -
  <title>Redo Log Switch Report</title> -
  <style type="text/css"> -
    body              {font:9pt Arial,Helvetica,sans-serif; color:black; background:White;} -
    p                 {font:9pt Arial,Helvetica,sans-serif; color:black; background:White;} -
    table,tr,td       {font:9pt Arial,Helvetica,sans-serif; color:Black; background:#C0C0C0; padding:0px 0px 0px 0px; margin:0px 0px 0px 0px;} -
    th                {font:bold 9pt Arial,Helvetica,sans-serif; color:#336699; background:#cccc99; padding:0px 0px 0px 0px;} -
    h1                {font:bold 12pt Arial,Helvetica,Geneva,sans-serif; color:#336699; background-color:White; border-bottom:1px solid #cccc99; margin-top:0pt; margin-bottom:0pt; padding:0px 0px 0px 0px;} -
    h2                {font:bold 10pt Arial,Helvetica,Geneva,sans-serif; color:#336699; background-color:White; margin-top:4pt; margin-bottom:0pt;} -
    a                 {font:9pt Arial,Helvetica,sans-serif; color:#663300; margin-top:0pt; margin-bottom:0pt; vertical-align:top;} -
    a.link            {font:9pt Arial,Helvetica,sans-serif; color:#663300; margin-top:0pt; margin-bottom:0pt; vertical-align:top;} -
    a.noLink          {font:9pt Arial,Helvetica,sans-serif; color:#663300; text-decoration: none; margin-top:0pt; margin-bottom:0pt; vertical-align:top;} -
    a.noLinkBlue      {font:9pt Arial,Helvetica,sans-serif; color:#0000ff; text-decoration: none; margin-top:0pt; margin-bottom:0pt; vertical-align:top;} -
    a.noLinkDarkBlue  {font:9pt Arial,Helvetica,sans-serif; color:#000099; text-decoration: none; margin-top:0pt; margin-bottom:0pt; vertical-align:top;} -
    a.noLinkRed       {font:9pt Arial,Helvetica,sans-serif; color:#ff0000; text-decoration: none; margin-top:0pt; margin-bottom:0pt; vertical-align:top;} -
    a.noLinkDarkRed   {font:9pt Arial,Helvetica,sans-serif; color:#990000; text-decoration: none; margin-top:0pt; margin-bottom:0pt; vertical-align:top;} -
    a.noLinkGreen     {font:9pt Arial,Helvetica,sans-serif; color:#00ff00; text-decoration: none; margin-top:0pt; margin-bottom:0pt; vertical-align:top;} -
    a.noLinkDarkGreen {font:9pt Arial,Helvetica,sans-serif; color:#009900; text-decoration: none; margin-top:0pt; margin-bottom:0pt; vertical-align:top;} -
  </style>' -
body   'BGCOLOR="#C0C0C0"' -

table  'BORDER="1"'

set heading on
prompt Redo Log Switches for a month

CLEAR COLUMNS BREAKS COMPUTES

COLUMN DAY   FORMAT a75              HEADING 'MM/dd; Time'
COLUMN H00   FORMAT 999,999B         HEADING '00'
COLUMN H01   FORMAT 999,999B         HEADING '01'
COLUMN H02   FORMAT 999,999B         HEADING '02'
COLUMN H03   FORMAT 999,999B         HEADING '03'
COLUMN H04   FORMAT 999,999B         HEADING '04'
COLUMN H05   FORMAT 999,999B         HEADING '05'
COLUMN H06   FORMAT 999,999B         HEADING '06'
COLUMN H07   FORMAT 999,999B         HEADING '07'
COLUMN H08   FORMAT 999,999B         HEADING '08'
COLUMN H09   FORMAT 999,999B         HEADING '09'
COLUMN H10   FORMAT 999,999B         HEADING '10'
COLUMN H11   FORMAT 999,999B         HEADING '11'
COLUMN H12   FORMAT 999,999B         HEADING '12'
COLUMN H13   FORMAT 999,999B         HEADING '13'
COLUMN H14   FORMAT 999,999B         HEADING '14'
COLUMN H15   FORMAT 999,999B         HEADING '15'
COLUMN H16   FORMAT 999,999B         HEADING '16'
COLUMN H17   FORMAT 999,999B         HEADING '17'
COLUMN H18   FORMAT 999,999B         HEADING '18'
COLUMN H19   FORMAT 999,999B         HEADING '19'
COLUMN H20   FORMAT 999,999B         HEADING '20'
COLUMN H21   FORMAT 999,999B         HEADING '21'
COLUMN H22   FORMAT 999,999B         HEADING '22'
COLUMN H23   FORMAT 999,999B         HEADING '23'
COLUMN TOTAL FORMAT 999,999,999      HEADING 'Total'

break on report

compute  avg LABEL 'Average:' sum LABEL 'Total:' of total  ON report

SELECT
    SUBSTR(TO_CHAR(first_time, 'MM/DD/RR HH:MI:SS'),1,5) || TO_CHAR(first_time, ' Dy') DAY
  , SUM(DECODE(SUBSTR(TO_CHAR(first_time, 'MM/DD/RR HH24:MI:SS'),10,2),'00',1,0)) H00
  , SUM(DECODE(SUBSTR(TO_CHAR(first_time, 'MM/DD/RR HH24:MI:SS'),10,2),'01',1,0)) H01
  , SUM(DECODE(SUBSTR(TO_CHAR(first_time, 'MM/DD/RR HH24:MI:SS'),10,2),'02',1,0)) H02
  , SUM(DECODE(SUBSTR(TO_CHAR(first_time, 'MM/DD/RR HH24:MI:SS'),10,2),'03',1,0)) H03
  , SUM(DECODE(SUBSTR(TO_CHAR(first_time, 'MM/DD/RR HH24:MI:SS'),10,2),'04',1,0)) H04
  , SUM(DECODE(SUBSTR(TO_CHAR(first_time, 'MM/DD/RR HH24:MI:SS'),10,2),'05',1,0)) H05
  , SUM(DECODE(SUBSTR(TO_CHAR(first_time, 'MM/DD/RR HH24:MI:SS'),10,2),'06',1,0)) H06
  , SUM(DECODE(SUBSTR(TO_CHAR(first_time, 'MM/DD/RR HH24:MI:SS'),10,2),'07',1,0)) H07
  , SUM(DECODE(SUBSTR(TO_CHAR(first_time, 'MM/DD/RR HH24:MI:SS'),10,2),'08',1,0)) H08
  , SUM(DECODE(SUBSTR(TO_CHAR(first_time, 'MM/DD/RR HH24:MI:SS'),10,2),'09',1,0)) H09
  , SUM(DECODE(SUBSTR(TO_CHAR(first_time, 'MM/DD/RR HH24:MI:SS'),10,2),'10',1,0)) H10
  , SUM(DECODE(SUBSTR(TO_CHAR(first_time, 'MM/DD/RR HH24:MI:SS'),10,2),'11',1,0)) H11
  , SUM(DECODE(SUBSTR(TO_CHAR(first_time, 'MM/DD/RR HH24:MI:SS'),10,2),'12',1,0)) H12
  , SUM(DECODE(SUBSTR(TO_CHAR(first_time, 'MM/DD/RR HH24:MI:SS'),10,2),'13',1,0)) H13
  , SUM(DECODE(SUBSTR(TO_CHAR(first_time, 'MM/DD/RR HH24:MI:SS'),10,2),'14',1,0)) H14
  , SUM(DECODE(SUBSTR(TO_CHAR(first_time, 'MM/DD/RR HH24:MI:SS'),10,2),'15',1,0)) H15
  , SUM(DECODE(SUBSTR(TO_CHAR(first_time, 'MM/DD/RR HH24:MI:SS'),10,2),'16',1,0)) H16
  , SUM(DECODE(SUBSTR(TO_CHAR(first_time, 'MM/DD/RR HH24:MI:SS'),10,2),'17',1,0)) H17
  , SUM(DECODE(SUBSTR(TO_CHAR(first_time, 'MM/DD/RR HH24:MI:SS'),10,2),'18',1,0)) H18
  , SUM(DECODE(SUBSTR(TO_CHAR(first_time, 'MM/DD/RR HH24:MI:SS'),10,2),'19',1,0)) H19
  , SUM(DECODE(SUBSTR(TO_CHAR(first_time, 'MM/DD/RR HH24:MI:SS'),10,2),'20',1,0)) H20
  , SUM(DECODE(SUBSTR(TO_CHAR(first_time, 'MM/DD/RR HH24:MI:SS'),10,2),'21',1,0)) H21
  , SUM(DECODE(SUBSTR(TO_CHAR(first_time, 'MM/DD/RR HH24:MI:SS'),10,2),'22',1,0)) H22
  , SUM(DECODE(SUBSTR(TO_CHAR(first_time, 'MM/DD/RR HH24:MI:SS'),10,2),'23',1,0)) H23
  , COUNT(*)                                                                      TOTAL
FROM
  v$log_history  a
  where trunc(first_time) >= trunc(sysdate)-30
GROUP BY SUBSTR(TO_CHAR(first_time, 'MM/DD/RR HH:MI:SS'),1,5) || TO_CHAR(first_time, ' Dy')
order BY SUBSTR(TO_CHAR(first_time, 'MM/DD/RR HH:MI:SS'),1,5) || TO_CHAR(first_time, ' Dy')
;
spool archive_log_count.html
/
spool off

exit

Output report: