1.What is Linux
Linux is, in simplest terms, an operating system. It is the software on a computer that enables applications and the computer operator to access the devices on the computer to perform desired functions.
The operating system (OS) sends instructions from an application to the computer's processor. The processor performs the instructed task, then sends the results back to the application via the operating system.
On August 25, 1991, a Finn computer science student named Linus Torvalds developed the Linux.
2.Flavors of UNIX
Unix is an open source operating system. It was developed in 1969 by Ken Thompson at Bell Labs. That was overtaken by many vendors and developed by their own standards and according to their use. And in recent time we have many flavors of Unix.
The term flavors of UNIX refers to the many Unix-like operating systems that have been developed based on the original UNIX that was written in 1969 by Ken Thompson at Bell Labs.
Fragmentation of UNIX occurred almost from the beginning. It was the result of both commercial pressures and differences in opinion among developers as to the way in which operating systems should behave.
Among the ways in which the various flavors of UNIX differ are (1) fundamental design, (2) commands and features, (3) the hardware platform(s) (i.e., processors) for which they are intended and (4) whether they are proprietary software (i.e., commercial software) or free software (i.e., software that anyone can obtain at no cost and use for any desired purpose).
Many of the proprietary flavors have been designed to run only (or mainly) on proprietary hardware sold by the same company that has developed them. Examples include:
AIX - developed by IBM for use on its mainframe computers
BSD/OS - a commercial version of BSD developed by Wind River for Intel processors
HP-UX - developed by Hewlett-Packard for its HP 9000 series of business servers
IRIX - developed by SGI for applications that use 3-D visualization and virtual reality
QNX - a real time operating system developed by QNX Software Systems primarily for use in embedded systems
SOLARIS - developed by Sun Microsystems for the SPARC platform and the most widely used proprietary flavor for web servers
Tru64 - developed by Compaq for the Alpha processor
Others are developed by groups of volunteers who make them available for free. Among them are:
Linux - the most popular and fastest growing of all the Unix-like operating systems
FreeBSD - the most popular of the BSD systems (all of which are direct descendants of BSD UNIX, which was developed at the University of California at Berkeley)
NetBSD - features the ability to run on more than 50 platforms, ranging from acorn26 to x68k
OpenBSD - may have already attained its goal of becoming the most secure of all computer operating systems
Darwin - the new version of BSD that serves as the core for the Mac OS X
This diversity has had both positive and negative effects. Most importantly, it has resulted in a healthy competition amongst them, which has been a major factor in the rapid improvement of the Unix-like systems as a whole.
3.Advantage of Linux:
Low cost: You don’t need to spend time and money to obtain licenses since Linux and much of its software come with the GNU General Public License. You can start to work immediately without worrying that your software may stop working anytime because the free trial version expires. Additionally, there are large repositories from which you can freely download high quality software for almost any task you can think of.
Stability: Linux doesn’t need to be rebooted periodically to maintain performance levels. It doesn’t freeze up or slow down over time due to memory leaks and such. Continuous up-times of hundreds of days (up to a year or more) are not uncommon.
Performance: Linux provides persistent high performance on workstations and on networks. It can handle unusually large numbers of users simultaneously, and can make old computers sufficiently responsive to be useful again.
Network friendliness: Linux was developed by a group of programmers over the Internet and has therefore strong support for network functionality; client and server systems can be easily set up on any computer running Linux. It can perform tasks such as network backups faster and more reliably than alternative systems.
Compatibility: It runs all common Unix software packages and can process all common file formats.
Fast and easy installation: Most Linux distributions come with user-friendly installation and setup programs. Popular Linux distributions come with tools that make installation of additional software very user friendly as well.
Multitasking: Linux is designed to do many things at the same time; e.g., a large printing job in the background won’t slow down your other work.
Security: Linux is one of the most secure operating systems. “Walls” and flexible file access permission systems prevent access by unwanted visitors or viruses. Linux users have to option to select and safely download software, free of charge, from online repositories containing thousands of high quality packages. No purchase transactions requiring credit card numbers or other sensitive personal information are necessary.
Open Source: If you develop software that requires knowledge or modification of the operating system code, Linux’s source code is at your fingertips. Most Linux applications are Open Source as well.
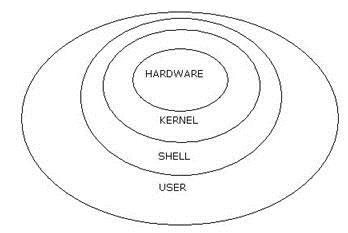
4.Architecture of Linux operating system


Linux System Architecture is consists of following layers
Hardware layer - Hardware consists of all peripheral devices (RAM/ HDD/ CPU etc).
Kernel - Core component of Operating System, interacts directly with hardware, provides low level services to upper layer components.
Shell - An interface to kernel, hiding complexity of kernel's functions from users. Takes commands from user and executes kernel's functions.
Utilities - Utility programs giving user most of the functionalities of an operating systems.
Understanding the UNIX Shell(s)
In UNIX systems, any commands you issue to the operating system are passed through a command interpreter layer around the kernel called the shell. When you initially log in, you are communicating with this shell. The kernel is the part of UNIX that actually interacts with the hardware to complete tasks such as writing data to disk or printing to a printer. The shell translates your simple commands into a form the kernel can understand and returns the results to you. Therefore, any commands you issue as a user are shell commands, and any scripts (small programs of grouped commands) that you write are shell scripts.
The UNIX shell has many variants, but they are fundamentally the same, and you can easily
migrate from one to another. Here’s a list of the main UNIX and Linux shell commands and the shells they run:
• sh: The Bourne shell, which was written by Steven Bourne. It is the original UNIX shell, and is
quite simple in the range of its features.
• csh: The C shell, which uses syntax somewhat similar to the C programming language. It
contains advanced job control, aliasing, and file-naming features.
• ksh: The Korn shell, which is considered a superset of the Bourne shell. It adds several sophisticated capabilities to the basic Bourne shell.
• bash: The “Bourne Again Shell,” which includes features of both the Bourne and the C shell.
For the sake of consistency, I use the Korn shell throughout this book, although I show a couple
of important C shell variations. Most UNIX systems can run several shells; that is, you can choose to run your session or your programs in a particular shell, and you can easily switch among the shells.
The Linux default shell is BASH, the Bourne Again Shell, which includes features of the Bourne
shell as well as the Korn, C, and TCSH shells.
■Note Most of the basic commands are the same in all the shells, but some commands may not work, or may work differently, in different shells. You need to remember this when you switch among shells.
It is possible to invoke any available shell from within another shell. To start a new shell, you
simply type the name of the shell you want to run, ksh, csh, or sh. It is also possible to set the default startup shell for all your future sessions. The default shell for your account is stored in the /etc/ passwd file, along with related information about your account. To change your default shell, use the chsh command.
5.File system hierarchy
File: A file is a named collection of related information that is recorded on secondary storage such as magnetic disks, magnetic tapes and optical disks.In general, a file is a sequence of bits, bytes, lines or records whose meaning is defined by the files creator and user.
File structure: it is a structure, which is according to a required format that operating system can understand.
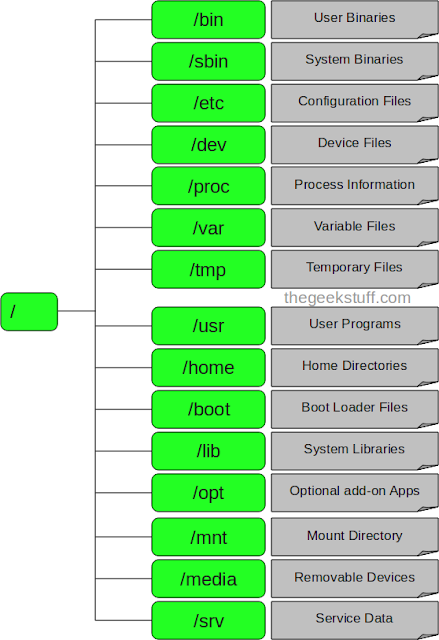
Root:
Every single file and directory starts from the root directory.
Only root user has write privilege under this directory.
Please note that /root is root user’s home directory, which is not same as /
/bin: User binaries:
Contains binary executables.
Common linux commands you need to use in single-user modes are located under this directory.
Commands used by all the users of the system are located here.
For example: ps, ls, ping, grep, cp.
/sbin: – System Binaries:
Just like /bin, /sbin also contains binary executables.
But, the linux commands located under this directory are used typically by system aministrator, for system maintenance purpose.
For example: iptables, reboot, fdisk, ifconfig, swapon
/etc: – Configuration Files:
Contains configuration files required by all programs.
This also contains startup and shutdown shell scripts used to start/stop individual programs.
For example: /etc/resolv.conf, /etc/logrotate.conf
/dev: – Device Files:
Contains device files.
These include terminal devices, usb, or any device attached to the system.
For example: /dev/tty1, /dev/usbmon0
/proc: – Process Information:
Contains information about system process.
This is a pseudo filesystem contains information about running process. For example: /proc/{pid} directory contains information about the process with that particular pid.
This is a virtual filesystem with text information about system resources. For example: /proc/uptime
/var: – Variable Files:
var stands for variable files.
Content of the files that are expected to grow can be found under this directory.
This includes — system log files (/var/log); packages and database files (/var/lib); emails (/var/mail); print queues (/var/spool); lock files (/var/lock); temp files needed across reboots (/var/tmp);
/tmp: – Temporary Files:
Directory that contains temporary files created by system and users.
Files under this directory are deleted when system is rebooted.
/usr: – User Programs:
Contains binaries, libraries, documentation, and source-code for second level programs.
/usr/bin contains binary files for user programs. If you can’t find a user binary under /bin, look under /usr/bin. For example: at, awk, cc, less, scp
/usr/sbin contains binary files for system administrators. If you can’t find a system binary under /sbin, look under /usr/sbin. For example: atd, cron, sshd, useradd, userdel
/usr/lib contains libraries for /usr/bin and /usr/sbin
/usr/local contains users programs that you install from source. For example, when you install apache from source, it goes under /usr/local/apache2
/home: – Home Directories:
Home directories for all users to store their personal files.
For example: /home/john, /home/nikita
/boot: – Boot Loader Files:
Contains boot loader related files.
Kernel initrd, vmlinux, grub files are located under /boot
For example: initrd.img-2.6.32-24-generic, vmlinuz-2.6.32-24-generic
/lib: – System Libraries:
Contains library files that supports the binaries located under /bin and /sbin
Library filenames are either ld* or lib*.so.*
For example: ld-2.11.1.so, libncurses.so.5.7
/opt: – Optional add-on Applications:
opt stands for optional.
Contains add-on applications from individual vendors.
add-on applications should be installed under either /opt/ or /opt/ sub-directory.
/mnt: – Mount Directory:
Temporary mount directory where sysadmins can mount filesystems.
/media: – Removable Media Devices:
Temporary mount directory for removable devices.
For examples, /media/cdrom for CD-ROM; /media/floppy for floppy drives; /media/cdrecorder for CD writer
/srv: – Service Data:
srv stands for service.
Contains server specific services related data.
For example, /srv/cvs contains CVS related data.
6.LS command
About ls: Lists the contents of a directory. List information about the FILEs (the current directory by default)
Syntax: ls [OPTION]... [FILE]...
Display One File Per Line Using ls -1
1.To show single entry per line, use -1 option as shown below.
$ ls -1
bin
boot
cdrom
dev
etc
home
initrd
initrd.img
lib
1.Display All Information About Files/Directories Using ls -l
To show long listing information about the file/directory.
$ ls -l
-rw-r----- 1 ramesh team-dev 9275204 Jun 13 15:27 mthesaur.txt.gz
1st Character – File Type: First character specifies the type of the file. In the example above the hyphen (-) in the 1st character indicates that this is a normal file. Following are the possible file type options in the 1st character of the ls -l output.
Field Explanation
- normal file
d directory
s socket file
l link file
Field 1 – File Permissions: Next 9 character specifies the files permission. Each 3 characters refers to the read, write, execute permissions for user, group and world In this example, -rw-r—– indicates
read-write permission for user, read permission for group, and no permission for others.
Field 2 – Number of links: Second field specifies the number of links for that file. In this example, 1 indicates only one link to this file.
Field 3 – Owner: Third field specifies owner of the file. In this example, this file is owned by username ‘ramesh’.
Field 4 – Group: Fourth field specifies the group of the file. In this example, this file belongs to ”team-dev’ group.
Field 5 – Size: Fifth field specifies the size of file. In this example, ’9275204′ indicates the file size.
Field 6 – Last modified date & time: Sixth field specifies the date and time of the last modification of the file. In this example, ‘Jun 13 15:27′ specifies the last modification time of the file.
Field 7 – File name: The last field is the name of the file. In this example, the file name is mthesaur.txt.gz.
4. Display File Size in Human Readable Format Using ls -lh
Use ls -lh (h stands for human readable form), to display file size in easy to read format. i.e M for MB, K for KB, G for GB.
$ ls –l
-rw-r----- 1 ramesh team-dev 9275204 Jun 12 15:27 arch-linux.txt.gz*
$ ls -lh
-rw-r----- 1 ramesh team-dev 8.9M Jun 12 15:27 arch-linux.txt.gz
5. Display Directory Information Using ls -ld
When you use “ls -l” you will get the details of directories content. But if you want the details of directory then you can use -d option as., For example, if you use ls -l /etc will display all the files under etc directory. But, if you want to display the information about the /etc/ directory, use -ld option as shown below.
$ ls -l /etc
total 3344
-rw-r--r-- 1 root root 15276 Oct 5 2004 a2ps.cfg
-rw-r--r-- 1 root root 2562 Oct 5 2004 a2ps-site.cfg
drwxr-xr-x 4 root root 4096 Feb 2 2007 acpi
-rw-r--r-- 1 root root 48 Feb 8 2008 adjtime
drwxr-xr-x 4 root root 4096 Feb 2 2007 alchemist
$ ls -ld /etc
drwxr-xr-x 21 root root 4096 Jun 15 07:02 /etc
6. Order Files Based on Last Modified Time Using ls -lt
To sort the file names displayed in the order of last modification time use the -t option. You will be finding it handy to use it in combination with -l option.
$ ls -lt
total 76
drwxrwxrwt 14 root root 4096 Jun 22 07:36 tmp
drwxr-xr-x 121 root root 4096 Jun 22 07:05 etc
drwxr-xr-x 13 root root 13780 Jun 22 07:04 dev
drwxr-xr-x 13 root root 4096 Jun 20 23:12 root
drwxr-xr-x 12 root root 4096 Jun 18 08:31 home
drwxr-xr-x 2 root root 4096 May 17 21:21 sbin
lrwxrwxrwx 1 root root 11 May 17 20:29 cdrom -> media/cdrom
drwx------ 2 root root 16384 May 17 20:29 lost+found
drwxr-xr-x 15 root root 4096 Jul 2 2008 var
7. Order Files Based on Last Modified Time (In Reverse Order) Using ls -ltr
To sort the file names in the last modification time in reverse order. This will be showing the last edited file in the last line which will be handy when the listing goes beyond a page. This is my default ls usage. Anytime I do ls, I always use ls -ltr as I find this very convenient.
$ ls -ltr
total 76
drwxr-xr-x 15 root root 4096 Jul 2 2008 var
drwx------ 2 root root 16384 May 17 20:29 lost+found
lrwxrwxrwx 1 root root 11 May 17 20:29 cdrom -> media/cdrom
drwxr-xr-x 2 root root 4096 May 17 21:21 sbin
drwxr-xr-x 12 root root 4096 Jun 18 08:31 home
drwxr-xr-x 13 root root 4096 Jun 20 23:12 root
drwxr-xr-x 13 root root 13780 Jun 22 07:04 dev
drwxr-xr-x 121 root root 4096 Jun 22 07:05 etc
drwxrwxrwt 14 root root 4096 Jun 22 07:36 tmp
8. Display Hidden Files Using ls -a (or) ls -A
To show all the hidden files in the directory, use ‘-a option’. Hidden files in Unix starts with ‘.’ in its file name.
$ ls -a
.bash_history Fedora-Info.txt
.bash_logout .lftp
.bash_profile libiconv-1.11.tar.tar
.bashrc libssh2-0.12-1.2.el4.rf.i386.rpm
It will show all the files including the ‘.’ (current directory) and ‘..’ (parent directory). To show the hidden files, but not the ‘.’ (current directory) and ‘..’ (parent directory), use option -A.
$ ls -A
Debian-Info.txt Fedora-Info.txt
CentOS-Info.txt Red-Hat-Info.txt
.bash_history SUSE-Info.txt
.bash_logout .lftp
.bash_profile libiconv-1.11.tar.tar
.bashrc libssh2-0.12-1.2.el4.rf.i386.rpm
[Note: . and .. are not displayed here]
2.File and directory related command
# cd /home enter to directory '/ home'
# cd .. go back one level
# cd ../.. go back two levels
# cd go to home directory
# cd ~user1 go to home directory
# cd - go to previous directory
# cp file1 file2 copying a file
# cp dir/* . copy all files of a directory within the current work directory
# cp -a /tmp/dir1 . copy a directory within the current work directory
# cp -a dir1 dir2 copy a directory
# mkdir dir1 create a directory called 'dir1'
# mkdir dir1 dir2 create two directories simultaneously
# mkdir -p /tmp/dir1/dir2 create a directory tree
# mv dir1 new_dir rename / move a file or directory
# pwd show the path of work directory
# rm -f file1 delete file called 'file1'
# rm -rf dir1 remove a directory called 'dir1' and contents recursively
# rm -rf dir1 dir2 remove two directories and their contents recursively
# rmdir dir1 delete directory called 'dir1'
# touch -t 0712250000 file1 modify timestamp of a file or directory - (YYMMDDhhmm)
# tree show files and directories in a tree starting from root(1)
3. Find command
# find / -name file1 search file and directory into root filesystem from '/'
# find / -user user1 search files and directories belonging to 'user1'
# find /home/user1 -name \*.bin search files with '. bin' extension within directory '/ home/user1'
# find /usr/bin -type f -atime +100 search binary files are not used in the last 100 days
# find /usr/bin -type f -mtime -10 search files created or changed within 10 days
# find / -name *.rpm -exec chmod 755 '{}' \; search files with '.rpm' extension and modify permits
# find / -xdev -name \*.rpm search files with '.rpm' extension ignoring removable partitions as cdrom, pen-drive, etc.…
# locate \*.ps find files with the '.ps' extension - first run 'updatedb' command
4. To display the content of a file
cat (concatenate) :The command cat can be used to display the contents of a file on the screen. Type:
head: The head command writes the first ten lines of a file to the screen.
First clear the screen then type
$head science.txt
Then type
$head -5 science.txt
What difference did the -5 do to the head command?
tail
The tail command writes the last ten lines of a file to the screen.
here is another tail command that will show the progress of a file
5. wc (word count)
A handy little utility is the wc command, short for word count. To do a word count on file, type
[oracle@ushofsvpracbl2 ~]$ wc -w testifle1
To find out how many lines the file has, type
[oracle@ushofsvpracbl2 ~]$ wc -l testifle1
6. Redirection command
Most processes initiated by UNIX commands write to the standard output (that is, they write to the terminal screen), and many take their input from the standard input (that is, they read it from the keyboard). There is also the standard error, where processes write their error messages, by default, to the terminal screen.
We have already seen one use of the cat command to write the contents of a file to the screen.
Now type cat without specifying a file to read
$ cat
Then type a few words on the keyboard and press the [Return] key. Finally hold the [Ctrl] key down and press [d] (written as ^D for short) to end the input.
What has happened?
If you run the cat command without specifying a file to read, it reads the standard input (the keyboard), and on receiving the 'end of file' (^D), copies it to the standard output (the screen).
In UNIX, we can redirect both the input and the output of commands.
3.2 Redirecting the Output
We use the > symbol to redirect the output of a command. For example, to create a file called list1 containing a list of fruit, type
$cat > list1
Then type in the names of some fruit. Press [Return] after each one.
pear
banana
apple
^D {this means press [Ctrl] and [d] to stop}
What happens is the cat command reads the standard input (the keyboard) and the > redirects the output, which normally goes to the screen, into a file called list1
To read the contents of the file, type
$ cat list1
Using the above method, create another file called list2 containing the following fruit: orange, plum, mango, grapefruit. Read the contents of list2
3.2.1 Appending to a file
The form >> appends standard output to a file. So to add more items to the file list1, type
$ cat >> list1
Then type in the names of more fruit
peach
grape
orange
^D (Control D to stop)
To read the contents of the file, type
$ cat list1
You should now have two files. One contains six fruit, the other contains four fruit.
We will now use the cat command to join (concatenate) list1 and list2 into a new file called biglist. Type
$ cat list1 list2 > biglist
What this is doing is reading the contents of list1 and list2 in turn, then outputing the text to the file biglist
To read the contents of the new file, type
$ cat biglist
7. Wildcards
The * wildcard
The character * is called a wildcard, and will match against none or more character(s) in a file (or directory) name. For example, in your unixstuff directory, type
$ ls list*
This will list all files in the current directory starting with list....
Try typing
$ ls *list
This will list all files in the current directory ending with ....list
The ? wildcard
The character ? will match exactly one character.
So ?ouse will match files like house and mouse, but not grouse.
Try typing
$ls ?list
8. On-line Manuals
There are on-line manuals which gives information about most commands. The manual pages tell you which options a particular command can take, and how each option modifies the behaviour of the command. Type man command to read the manual page for a particular command.
For example, to find out more about the wc (word count) command, type
$ man wc
Alternatively
$ whatis wc
gives a one-line description of the command, but omits any information about options etc.
9. ps (process status)
Alternatively, processes can be killed by finding their process numbers (PIDs) and using kill PID_number
$ ps
PID TT S TIME COMMAND
20077 pts/5 S 0:05 sleep 1000
21563 pts/5 T 0:00 netscape
21873 pts/5 S 0:25 nedit
$ kill 20077
and then type ps again to see if it has been removed from the list.
If a process refuses to be killed, uses the -9 option, i.e. type
$ kill -9 20077
10. gzip command
This reduces the size of a file, thus freeing valuable disk space. For example, type
$ ls -l science.txt
and note the size of the file using ls -l . Then to compress science.txt, type
$ gzip science.txt
This will compress the file and place it in a file called science.txt.gz
To see the change in size, type ls -l again.
To expand the file, use the gunzip command.
$ gunzip science.txt.gz
11.File and directory permission related command
Chmod(change mode)
chmod is used to change the permissions of files or directories.
Overview
On Linux and other Unix-like operating systems, there is a set of rules for each file which defines who can access that file, and how they can access it. These rules are called file permissions or file modes. The command name chmod stands for "change mode", and it is used to define the way a file can be accessed.
Before continuing, you should read the section What Are File Permissions, And How Do They Work? in our documentation of the umask command. It contains a comprehensive description of how to define and express file permissions.
In general, chmod commands take the form:
chmod options permissions filename
If no options are specified, chmod modifies the permissions of the file specified by filename to the permissions specified by permissions.
permissions defines the permissions for the owner of the file (the "user"), members of the group who owns the file (the "group"), and anyone else ("others"). There are two ways to represent these permissions: with symbols (alphanumeric characters), or with octal numbers (the digits 0 through 7).
Let's say you are the owner of a file named myfile, and you want to set its permissions so that:
the user can read, write, and execute it;
members of your group can read and execute it; and
others may only read it.
This command will do the trick:
chmod u=rwx,g=rx,o=r myfile
This is an example of using symbolic permissions notation. The letters u, g, and o stand for "user", "group", and "other". The equals sign ("=") means "set the permissions exactly like this," and the letters "r", "w", and "x" stand for "read", "write", and "execute", respectively. The commas separate the different classes of permissions, and there are no spaces in between them.
Here is the equivalent command using octal permissions notation:
$chmod 754 myfile
Here the digits 7, 5, and 4 each individually represent the permissions for the user, group, and others, in that order. Each digit is a combination of the numbers 4, 2, 1, and 0:
4 stands for "read",
2 stands for "write",
1 stands for "execute", and
0 stands for "no permission."
So 7 is the combination of permissions 4+2+1 (read, write, and execute), 5 is 4+0+1 (read, no write, and execute), and 4 is 4+0+0 (read, no write, and no execute).
See below for more examples of both types of notation.
12.Space related commands
DF
The df command reports the amount of available disk space being used by file systems.
1. Check File System Disk Space Usage
The “df” command displays the information of device name, total blocks, total disk space, used disk space, available disk space and mount points on a file system.
[root@tecmint ~]# df
2. Display Information of all File System Disk Space Usage.
The same as above, but it also displays information of dummy file systems along with all the file system disk usage and their memory utilization.
[root@tecmint ~]# df -a
3. Show Disk Space Usage in Human Readable Format
Have you noticed that above commands displays information in bytes, which is not readable yet all, because we are in a habit of reading the sizes in megabytes, gigabytes etc. as it makes very easy to understand and remember.
The df command provides an option to display sizes in Human Readable formats by using ‘-h’ (prints the results in human readable format (e.g., 1K 2M 3G)).
4. Display Information of /home File System
To see the information of only device /home file system in human readable format use the following command.
5. Display Information of File System in Bytes
To display all file system information and usage in 1024-byte blocks, use the option ‘-k‘ (e.g. –block-size=1K) as follows.
6. Display Information of File System in MB
To display information of all file system usage in MB (Mega Byte) use the option as ‘-m‘.
7. Display Information of File System in GB
To display information of all file system statistics in GB (Gigabyte) use the option as ‘df -h‘.
13. DU commands
du estimates and displays the disk space used by files.
Syntax
du [OPTION]... [FILE]...
du [OPTION]... --files0-from=F
To find out the disk usage summary of a /home/oracle/dir1/ directory tree and each of its sub directories. Enter the command as:
The output of the above command displays the number of disk blocks in the /home/oracle/dir1/ directory along with its sub-directories.
2. Using “-h” option with “du” command provides results in “Human Readable Format“. Means you can see sizes in Bytes, Kilobytes, Megabytes, Gigabytes etc.
3. To get the summary of a grand total disk usage size of an directory use the option “-s” as follows.
[root@tecmint]# du -sh /home/oracle/dir1/
4. Using “-a” flag with “du” command displays the disk usage of all the files and directories.
5. Using “-a” flag along with “-h” displays disk usage of all files and folders in human readeable format. The below output is more easy to understand as it shows the files in Kilobytes, Megabytes etc.
[root@tecmint]# du -ah /home/oracle/dir1/
6. Find out the disk usage of a directory tree with its subtress in Kilobyte blcoks. Use the “-k” (displays size in 1024 bytes units).
[root@tecmint]# du -k /home/oracle/dir1
7. To get the summary of disk usage of directory tree along with its subtrees in Megabytes (MB) only. Use the option “-mh” as follows. The “-m” flag counts the blocks in MB units and “-h” stands for human readable format.
[root@tecmint]# du -mh /home/oracle/dir1
8. The “-c” flag provides a grand total usage disk space at the last line. If your directory taken 674MB space, then the last
two line of the output would be.
9. The below command calculates and displays the disk usage of all files and directories, but excludes the files that matches given pattern. The below command excludes the “.txt” files while calculating the total size of diretory. So, this way you can exclude any file formats by using flag “-–exclude“. See the output there is no txt files entry.
10. Display the disk usage based on modification of time, use the flag “–time” as shown below.
14. FIND Command
Find searches for files in a directory hierarchy
The Linux find command is very powerful. It can search the entire file system to find files and directories according to the search criteria you specify. Besides using the find command to locate files, you can also use the command to execute other Linux commands (grep, mv, rm, etc.) on the files and directories you find, which makes find extremely powerful.
The find command is used to locate files on a Unix or Linux system. find will search any set of directories you specify for files that match the supplied search criteria. You can search for files by name, owner, group, type, permissions, date, and other criteria. The search is recursive in that it will search all subdirectories too. The syntax looks like this:
Syntax: find where-to-look criteria what-to-search
# find / -name test
By default it will show all the files and directories if we don’t specify the type option.
This will search the whole system for any files named test and display their pathnames. Here we are using the criterion ‑name with the argument test to tell find to perform a name search for the filename test. The output might look like this:
#find . -name test search under the current dir
If find doesn't locate any matching files, it produces no output.
You can specify as many places to search as you wish:
Using wildcard search
Searching for a directory using -type d
We can also use –type f to search for a file
case-insensitive searching
--------------------------
#find . -iname test
#find . -iname foo -type d # same thing, but only dirs
#find . -iname foo -type f # same thing, but only files
find files with different extensions
------------------------------------
find . -type f \( -name '*.trc' -o -name '*.trm' \)
find . -type f \( -name '*.sql' -o -name '*.sh' \)
find . -type f \( -name "*cache" -o -name "*xml" -o -name "*html" \)
find . -type f \( -name '*.txt' -o -name '*.ksh' \)
find files that don't match a pattern (-not)
--------------------------------------------
find . -type f -not -name "*.log" # find all files not ending in ".log”
find files and act on them (find + exec)
------------------------------------------------------
find /usr/local -name "*.html" -type f -exec chmod 644 {} \; # change html files to mode 644
find htdocs cgi-bin -name "*.cgi" -type f -exec chmod 755 {} \; # change cgi files to mode 755
find . -name "*.pl" -exec ls -ld {} \; # run ls command on files found
find and copy
-------------
find . -type f -name "*.mp3" -exec cp {} /tmp/MusicFiles \; # cp *.mp3 files to /tmp/MusicFiles
copy one file to many dirs
--------------------------
find dir1 dir2 dir3 dir4 -type d -exec cp header.shtml {} \; # copy the file header.shtml to those dirs
find and delete
---------------
find . -type f -name "Foo*" -exec rm {} \; # remove all "Foo*" files under current dir
find . -type d -name CVS -exec rm -r {} \; # remove all subdirectories named "CVS" under current dir
find files by modification time
-------------------------------
find . -mtime -1 # 24 hours
find . -mtime -7 # last 7 days
find . -mtime -7 -type f # just files
find . -mtime -7 -type d # just dirs.
Linux is, in simplest terms, an operating system. It is the software on a computer that enables applications and the computer operator to access the devices on the computer to perform desired functions.
The operating system (OS) sends instructions from an application to the computer's processor. The processor performs the instructed task, then sends the results back to the application via the operating system.
On August 25, 1991, a Finn computer science student named Linus Torvalds developed the Linux.
2.Flavors of UNIX
Unix is an open source operating system. It was developed in 1969 by Ken Thompson at Bell Labs. That was overtaken by many vendors and developed by their own standards and according to their use. And in recent time we have many flavors of Unix.
The term flavors of UNIX refers to the many Unix-like operating systems that have been developed based on the original UNIX that was written in 1969 by Ken Thompson at Bell Labs.
Fragmentation of UNIX occurred almost from the beginning. It was the result of both commercial pressures and differences in opinion among developers as to the way in which operating systems should behave.
Among the ways in which the various flavors of UNIX differ are (1) fundamental design, (2) commands and features, (3) the hardware platform(s) (i.e., processors) for which they are intended and (4) whether they are proprietary software (i.e., commercial software) or free software (i.e., software that anyone can obtain at no cost and use for any desired purpose).
Many of the proprietary flavors have been designed to run only (or mainly) on proprietary hardware sold by the same company that has developed them. Examples include:
AIX - developed by IBM for use on its mainframe computers
BSD/OS - a commercial version of BSD developed by Wind River for Intel processors
HP-UX - developed by Hewlett-Packard for its HP 9000 series of business servers
IRIX - developed by SGI for applications that use 3-D visualization and virtual reality
QNX - a real time operating system developed by QNX Software Systems primarily for use in embedded systems
SOLARIS - developed by Sun Microsystems for the SPARC platform and the most widely used proprietary flavor for web servers
Tru64 - developed by Compaq for the Alpha processor
Others are developed by groups of volunteers who make them available for free. Among them are:
Linux - the most popular and fastest growing of all the Unix-like operating systems
FreeBSD - the most popular of the BSD systems (all of which are direct descendants of BSD UNIX, which was developed at the University of California at Berkeley)
NetBSD - features the ability to run on more than 50 platforms, ranging from acorn26 to x68k
OpenBSD - may have already attained its goal of becoming the most secure of all computer operating systems
Darwin - the new version of BSD that serves as the core for the Mac OS X
This diversity has had both positive and negative effects. Most importantly, it has resulted in a healthy competition amongst them, which has been a major factor in the rapid improvement of the Unix-like systems as a whole.
3.Advantage of Linux:
Low cost: You don’t need to spend time and money to obtain licenses since Linux and much of its software come with the GNU General Public License. You can start to work immediately without worrying that your software may stop working anytime because the free trial version expires. Additionally, there are large repositories from which you can freely download high quality software for almost any task you can think of.
Stability: Linux doesn’t need to be rebooted periodically to maintain performance levels. It doesn’t freeze up or slow down over time due to memory leaks and such. Continuous up-times of hundreds of days (up to a year or more) are not uncommon.
Performance: Linux provides persistent high performance on workstations and on networks. It can handle unusually large numbers of users simultaneously, and can make old computers sufficiently responsive to be useful again.
Network friendliness: Linux was developed by a group of programmers over the Internet and has therefore strong support for network functionality; client and server systems can be easily set up on any computer running Linux. It can perform tasks such as network backups faster and more reliably than alternative systems.
Compatibility: It runs all common Unix software packages and can process all common file formats.
Fast and easy installation: Most Linux distributions come with user-friendly installation and setup programs. Popular Linux distributions come with tools that make installation of additional software very user friendly as well.
Multitasking: Linux is designed to do many things at the same time; e.g., a large printing job in the background won’t slow down your other work.
Security: Linux is one of the most secure operating systems. “Walls” and flexible file access permission systems prevent access by unwanted visitors or viruses. Linux users have to option to select and safely download software, free of charge, from online repositories containing thousands of high quality packages. No purchase transactions requiring credit card numbers or other sensitive personal information are necessary.
Open Source: If you develop software that requires knowledge or modification of the operating system code, Linux’s source code is at your fingertips. Most Linux applications are Open Source as well.
4.Architecture of Linux operating system

Linux System Architecture is consists of following layers
Hardware layer - Hardware consists of all peripheral devices (RAM/ HDD/ CPU etc).
Kernel - Core component of Operating System, interacts directly with hardware, provides low level services to upper layer components.
Shell - An interface to kernel, hiding complexity of kernel's functions from users. Takes commands from user and executes kernel's functions.
Utilities - Utility programs giving user most of the functionalities of an operating systems.
Understanding the UNIX Shell(s)
In UNIX systems, any commands you issue to the operating system are passed through a command interpreter layer around the kernel called the shell. When you initially log in, you are communicating with this shell. The kernel is the part of UNIX that actually interacts with the hardware to complete tasks such as writing data to disk or printing to a printer. The shell translates your simple commands into a form the kernel can understand and returns the results to you. Therefore, any commands you issue as a user are shell commands, and any scripts (small programs of grouped commands) that you write are shell scripts.
The UNIX shell has many variants, but they are fundamentally the same, and you can easily
migrate from one to another. Here’s a list of the main UNIX and Linux shell commands and the shells they run:
• sh: The Bourne shell, which was written by Steven Bourne. It is the original UNIX shell, and is
quite simple in the range of its features.
• csh: The C shell, which uses syntax somewhat similar to the C programming language. It
contains advanced job control, aliasing, and file-naming features.
• ksh: The Korn shell, which is considered a superset of the Bourne shell. It adds several sophisticated capabilities to the basic Bourne shell.
• bash: The “Bourne Again Shell,” which includes features of both the Bourne and the C shell.
For the sake of consistency, I use the Korn shell throughout this book, although I show a couple
of important C shell variations. Most UNIX systems can run several shells; that is, you can choose to run your session or your programs in a particular shell, and you can easily switch among the shells.
The Linux default shell is BASH, the Bourne Again Shell, which includes features of the Bourne
shell as well as the Korn, C, and TCSH shells.
■Note Most of the basic commands are the same in all the shells, but some commands may not work, or may work differently, in different shells. You need to remember this when you switch among shells.
It is possible to invoke any available shell from within another shell. To start a new shell, you
simply type the name of the shell you want to run, ksh, csh, or sh. It is also possible to set the default startup shell for all your future sessions. The default shell for your account is stored in the /etc/ passwd file, along with related information about your account. To change your default shell, use the chsh command.
5.File system hierarchy
File: A file is a named collection of related information that is recorded on secondary storage such as magnetic disks, magnetic tapes and optical disks.In general, a file is a sequence of bits, bytes, lines or records whose meaning is defined by the files creator and user.
File structure: it is a structure, which is according to a required format that operating system can understand.

Root:
Every single file and directory starts from the root directory.
Only root user has write privilege under this directory.
Please note that /root is root user’s home directory, which is not same as /
/bin: User binaries:
Contains binary executables.
Common linux commands you need to use in single-user modes are located under this directory.
Commands used by all the users of the system are located here.
For example: ps, ls, ping, grep, cp.
/sbin: – System Binaries:
Just like /bin, /sbin also contains binary executables.
But, the linux commands located under this directory are used typically by system aministrator, for system maintenance purpose.
For example: iptables, reboot, fdisk, ifconfig, swapon
/etc: – Configuration Files:
Contains configuration files required by all programs.
This also contains startup and shutdown shell scripts used to start/stop individual programs.
For example: /etc/resolv.conf, /etc/logrotate.conf
/dev: – Device Files:
Contains device files.
These include terminal devices, usb, or any device attached to the system.
For example: /dev/tty1, /dev/usbmon0
/proc: – Process Information:
Contains information about system process.
This is a pseudo filesystem contains information about running process. For example: /proc/{pid} directory contains information about the process with that particular pid.
This is a virtual filesystem with text information about system resources. For example: /proc/uptime
/var: – Variable Files:
var stands for variable files.
Content of the files that are expected to grow can be found under this directory.
This includes — system log files (/var/log); packages and database files (/var/lib); emails (/var/mail); print queues (/var/spool); lock files (/var/lock); temp files needed across reboots (/var/tmp);
/tmp: – Temporary Files:
Directory that contains temporary files created by system and users.
Files under this directory are deleted when system is rebooted.
/usr: – User Programs:
Contains binaries, libraries, documentation, and source-code for second level programs.
/usr/bin contains binary files for user programs. If you can’t find a user binary under /bin, look under /usr/bin. For example: at, awk, cc, less, scp
/usr/sbin contains binary files for system administrators. If you can’t find a system binary under /sbin, look under /usr/sbin. For example: atd, cron, sshd, useradd, userdel
/usr/lib contains libraries for /usr/bin and /usr/sbin
/usr/local contains users programs that you install from source. For example, when you install apache from source, it goes under /usr/local/apache2
/home: – Home Directories:
Home directories for all users to store their personal files.
For example: /home/john, /home/nikita
/boot: – Boot Loader Files:
Contains boot loader related files.
Kernel initrd, vmlinux, grub files are located under /boot
For example: initrd.img-2.6.32-24-generic, vmlinuz-2.6.32-24-generic
/lib: – System Libraries:
Contains library files that supports the binaries located under /bin and /sbin
Library filenames are either ld* or lib*.so.*
For example: ld-2.11.1.so, libncurses.so.5.7
/opt: – Optional add-on Applications:
opt stands for optional.
Contains add-on applications from individual vendors.
add-on applications should be installed under either /opt/ or /opt/ sub-directory.
/mnt: – Mount Directory:
Temporary mount directory where sysadmins can mount filesystems.
/media: – Removable Media Devices:
Temporary mount directory for removable devices.
For examples, /media/cdrom for CD-ROM; /media/floppy for floppy drives; /media/cdrecorder for CD writer
/srv: – Service Data:
srv stands for service.
Contains server specific services related data.
For example, /srv/cvs contains CVS related data.
6.LS command
About ls: Lists the contents of a directory. List information about the FILEs (the current directory by default)
Syntax: ls [OPTION]... [FILE]...
Display One File Per Line Using ls -1
1.To show single entry per line, use -1 option as shown below.
$ ls -1
bin
boot
cdrom
dev
etc
home
initrd
initrd.img
lib
1.Display All Information About Files/Directories Using ls -l
To show long listing information about the file/directory.
$ ls -l
-rw-r----- 1 ramesh team-dev 9275204 Jun 13 15:27 mthesaur.txt.gz
1st Character – File Type: First character specifies the type of the file. In the example above the hyphen (-) in the 1st character indicates that this is a normal file. Following are the possible file type options in the 1st character of the ls -l output.
Field Explanation
- normal file
d directory
s socket file
l link file
Field 1 – File Permissions: Next 9 character specifies the files permission. Each 3 characters refers to the read, write, execute permissions for user, group and world In this example, -rw-r—– indicates
read-write permission for user, read permission for group, and no permission for others.
Field 2 – Number of links: Second field specifies the number of links for that file. In this example, 1 indicates only one link to this file.
Field 3 – Owner: Third field specifies owner of the file. In this example, this file is owned by username ‘ramesh’.
Field 4 – Group: Fourth field specifies the group of the file. In this example, this file belongs to ”team-dev’ group.
Field 5 – Size: Fifth field specifies the size of file. In this example, ’9275204′ indicates the file size.
Field 6 – Last modified date & time: Sixth field specifies the date and time of the last modification of the file. In this example, ‘Jun 13 15:27′ specifies the last modification time of the file.
Field 7 – File name: The last field is the name of the file. In this example, the file name is mthesaur.txt.gz.
4. Display File Size in Human Readable Format Using ls -lh
Use ls -lh (h stands for human readable form), to display file size in easy to read format. i.e M for MB, K for KB, G for GB.
$ ls –l
-rw-r----- 1 ramesh team-dev 9275204 Jun 12 15:27 arch-linux.txt.gz*
$ ls -lh
-rw-r----- 1 ramesh team-dev 8.9M Jun 12 15:27 arch-linux.txt.gz
5. Display Directory Information Using ls -ld
When you use “ls -l” you will get the details of directories content. But if you want the details of directory then you can use -d option as., For example, if you use ls -l /etc will display all the files under etc directory. But, if you want to display the information about the /etc/ directory, use -ld option as shown below.
$ ls -l /etc
total 3344
-rw-r--r-- 1 root root 15276 Oct 5 2004 a2ps.cfg
-rw-r--r-- 1 root root 2562 Oct 5 2004 a2ps-site.cfg
drwxr-xr-x 4 root root 4096 Feb 2 2007 acpi
-rw-r--r-- 1 root root 48 Feb 8 2008 adjtime
drwxr-xr-x 4 root root 4096 Feb 2 2007 alchemist
$ ls -ld /etc
drwxr-xr-x 21 root root 4096 Jun 15 07:02 /etc
6. Order Files Based on Last Modified Time Using ls -lt
To sort the file names displayed in the order of last modification time use the -t option. You will be finding it handy to use it in combination with -l option.
$ ls -lt
total 76
drwxrwxrwt 14 root root 4096 Jun 22 07:36 tmp
drwxr-xr-x 121 root root 4096 Jun 22 07:05 etc
drwxr-xr-x 13 root root 13780 Jun 22 07:04 dev
drwxr-xr-x 13 root root 4096 Jun 20 23:12 root
drwxr-xr-x 12 root root 4096 Jun 18 08:31 home
drwxr-xr-x 2 root root 4096 May 17 21:21 sbin
lrwxrwxrwx 1 root root 11 May 17 20:29 cdrom -> media/cdrom
drwx------ 2 root root 16384 May 17 20:29 lost+found
drwxr-xr-x 15 root root 4096 Jul 2 2008 var
7. Order Files Based on Last Modified Time (In Reverse Order) Using ls -ltr
To sort the file names in the last modification time in reverse order. This will be showing the last edited file in the last line which will be handy when the listing goes beyond a page. This is my default ls usage. Anytime I do ls, I always use ls -ltr as I find this very convenient.
$ ls -ltr
total 76
drwxr-xr-x 15 root root 4096 Jul 2 2008 var
drwx------ 2 root root 16384 May 17 20:29 lost+found
lrwxrwxrwx 1 root root 11 May 17 20:29 cdrom -> media/cdrom
drwxr-xr-x 2 root root 4096 May 17 21:21 sbin
drwxr-xr-x 12 root root 4096 Jun 18 08:31 home
drwxr-xr-x 13 root root 4096 Jun 20 23:12 root
drwxr-xr-x 13 root root 13780 Jun 22 07:04 dev
drwxr-xr-x 121 root root 4096 Jun 22 07:05 etc
drwxrwxrwt 14 root root 4096 Jun 22 07:36 tmp
8. Display Hidden Files Using ls -a (or) ls -A
To show all the hidden files in the directory, use ‘-a option’. Hidden files in Unix starts with ‘.’ in its file name.
$ ls -a
.bash_history Fedora-Info.txt
.bash_logout .lftp
.bash_profile libiconv-1.11.tar.tar
.bashrc libssh2-0.12-1.2.el4.rf.i386.rpm
It will show all the files including the ‘.’ (current directory) and ‘..’ (parent directory). To show the hidden files, but not the ‘.’ (current directory) and ‘..’ (parent directory), use option -A.
$ ls -A
Debian-Info.txt Fedora-Info.txt
CentOS-Info.txt Red-Hat-Info.txt
.bash_history SUSE-Info.txt
.bash_logout .lftp
.bash_profile libiconv-1.11.tar.tar
.bashrc libssh2-0.12-1.2.el4.rf.i386.rpm
[Note: . and .. are not displayed here]
2.File and directory related command
# cd /home enter to directory '/ home'
# cd .. go back one level
# cd ../.. go back two levels
# cd go to home directory
# cd ~user1 go to home directory
# cd - go to previous directory
# cp file1 file2 copying a file
# cp dir/* . copy all files of a directory within the current work directory
# cp -a /tmp/dir1 . copy a directory within the current work directory
# cp -a dir1 dir2 copy a directory
# mkdir dir1 create a directory called 'dir1'
# mkdir dir1 dir2 create two directories simultaneously
# mkdir -p /tmp/dir1/dir2 create a directory tree
# mv dir1 new_dir rename / move a file or directory
# pwd show the path of work directory
# rm -f file1 delete file called 'file1'
# rm -rf dir1 remove a directory called 'dir1' and contents recursively
# rm -rf dir1 dir2 remove two directories and their contents recursively
# rmdir dir1 delete directory called 'dir1'
# touch -t 0712250000 file1 modify timestamp of a file or directory - (YYMMDDhhmm)
# tree show files and directories in a tree starting from root(1)
3. Find command
# find / -name file1 search file and directory into root filesystem from '/'
# find / -user user1 search files and directories belonging to 'user1'
# find /home/user1 -name \*.bin search files with '. bin' extension within directory '/ home/user1'
# find /usr/bin -type f -atime +100 search binary files are not used in the last 100 days
# find /usr/bin -type f -mtime -10 search files created or changed within 10 days
# find / -name *.rpm -exec chmod 755 '{}' \; search files with '.rpm' extension and modify permits
# find / -xdev -name \*.rpm search files with '.rpm' extension ignoring removable partitions as cdrom, pen-drive, etc.…
# locate \*.ps find files with the '.ps' extension - first run 'updatedb' command
4. To display the content of a file
cat (concatenate) :The command cat can be used to display the contents of a file on the screen. Type:
head: The head command writes the first ten lines of a file to the screen.
First clear the screen then type
$head science.txt
Then type
$head -5 science.txt
What difference did the -5 do to the head command?
tail
The tail command writes the last ten lines of a file to the screen.
here is another tail command that will show the progress of a file
5. wc (word count)
A handy little utility is the wc command, short for word count. To do a word count on file, type
[oracle@ushofsvpracbl2 ~]$ wc -w testifle1
To find out how many lines the file has, type
[oracle@ushofsvpracbl2 ~]$ wc -l testifle1
6. Redirection command
Most processes initiated by UNIX commands write to the standard output (that is, they write to the terminal screen), and many take their input from the standard input (that is, they read it from the keyboard). There is also the standard error, where processes write their error messages, by default, to the terminal screen.
We have already seen one use of the cat command to write the contents of a file to the screen.
Now type cat without specifying a file to read
$ cat
Then type a few words on the keyboard and press the [Return] key. Finally hold the [Ctrl] key down and press [d] (written as ^D for short) to end the input.
What has happened?
If you run the cat command without specifying a file to read, it reads the standard input (the keyboard), and on receiving the 'end of file' (^D), copies it to the standard output (the screen).
In UNIX, we can redirect both the input and the output of commands.
3.2 Redirecting the Output
We use the > symbol to redirect the output of a command. For example, to create a file called list1 containing a list of fruit, type
$cat > list1
Then type in the names of some fruit. Press [Return] after each one.
pear
banana
apple
^D {this means press [Ctrl] and [d] to stop}
What happens is the cat command reads the standard input (the keyboard) and the > redirects the output, which normally goes to the screen, into a file called list1
To read the contents of the file, type
$ cat list1
Using the above method, create another file called list2 containing the following fruit: orange, plum, mango, grapefruit. Read the contents of list2
3.2.1 Appending to a file
The form >> appends standard output to a file. So to add more items to the file list1, type
$ cat >> list1
Then type in the names of more fruit
peach
grape
orange
^D (Control D to stop)
To read the contents of the file, type
$ cat list1
You should now have two files. One contains six fruit, the other contains four fruit.
We will now use the cat command to join (concatenate) list1 and list2 into a new file called biglist. Type
$ cat list1 list2 > biglist
What this is doing is reading the contents of list1 and list2 in turn, then outputing the text to the file biglist
To read the contents of the new file, type
$ cat biglist
7. Wildcards
The * wildcard
The character * is called a wildcard, and will match against none or more character(s) in a file (or directory) name. For example, in your unixstuff directory, type
$ ls list*
This will list all files in the current directory starting with list....
Try typing
$ ls *list
This will list all files in the current directory ending with ....list
The ? wildcard
The character ? will match exactly one character.
So ?ouse will match files like house and mouse, but not grouse.
Try typing
$ls ?list
8. On-line Manuals
There are on-line manuals which gives information about most commands. The manual pages tell you which options a particular command can take, and how each option modifies the behaviour of the command. Type man command to read the manual page for a particular command.
For example, to find out more about the wc (word count) command, type
$ man wc
Alternatively
$ whatis wc
gives a one-line description of the command, but omits any information about options etc.
9. ps (process status)
Alternatively, processes can be killed by finding their process numbers (PIDs) and using kill PID_number
$ ps
PID TT S TIME COMMAND
20077 pts/5 S 0:05 sleep 1000
21563 pts/5 T 0:00 netscape
21873 pts/5 S 0:25 nedit
$ kill 20077
and then type ps again to see if it has been removed from the list.
If a process refuses to be killed, uses the -9 option, i.e. type
$ kill -9 20077
10. gzip command
This reduces the size of a file, thus freeing valuable disk space. For example, type
$ ls -l science.txt
and note the size of the file using ls -l . Then to compress science.txt, type
$ gzip science.txt
This will compress the file and place it in a file called science.txt.gz
To see the change in size, type ls -l again.
To expand the file, use the gunzip command.
$ gunzip science.txt.gz
11.File and directory permission related command
Chmod(change mode)
chmod is used to change the permissions of files or directories.
Overview
On Linux and other Unix-like operating systems, there is a set of rules for each file which defines who can access that file, and how they can access it. These rules are called file permissions or file modes. The command name chmod stands for "change mode", and it is used to define the way a file can be accessed.
Before continuing, you should read the section What Are File Permissions, And How Do They Work? in our documentation of the umask command. It contains a comprehensive description of how to define and express file permissions.
In general, chmod commands take the form:
chmod options permissions filename
If no options are specified, chmod modifies the permissions of the file specified by filename to the permissions specified by permissions.
permissions defines the permissions for the owner of the file (the "user"), members of the group who owns the file (the "group"), and anyone else ("others"). There are two ways to represent these permissions: with symbols (alphanumeric characters), or with octal numbers (the digits 0 through 7).
Let's say you are the owner of a file named myfile, and you want to set its permissions so that:
the user can read, write, and execute it;
members of your group can read and execute it; and
others may only read it.
This command will do the trick:
chmod u=rwx,g=rx,o=r myfile
This is an example of using symbolic permissions notation. The letters u, g, and o stand for "user", "group", and "other". The equals sign ("=") means "set the permissions exactly like this," and the letters "r", "w", and "x" stand for "read", "write", and "execute", respectively. The commas separate the different classes of permissions, and there are no spaces in between them.
Here is the equivalent command using octal permissions notation:
$chmod 754 myfile
Here the digits 7, 5, and 4 each individually represent the permissions for the user, group, and others, in that order. Each digit is a combination of the numbers 4, 2, 1, and 0:
4 stands for "read",
2 stands for "write",
1 stands for "execute", and
0 stands for "no permission."
So 7 is the combination of permissions 4+2+1 (read, write, and execute), 5 is 4+0+1 (read, no write, and execute), and 4 is 4+0+0 (read, no write, and no execute).
See below for more examples of both types of notation.
12.Space related commands
DF
The df command reports the amount of available disk space being used by file systems.
1. Check File System Disk Space Usage
The “df” command displays the information of device name, total blocks, total disk space, used disk space, available disk space and mount points on a file system.
[root@tecmint ~]# df
2. Display Information of all File System Disk Space Usage.
The same as above, but it also displays information of dummy file systems along with all the file system disk usage and their memory utilization.
[root@tecmint ~]# df -a
3. Show Disk Space Usage in Human Readable Format
Have you noticed that above commands displays information in bytes, which is not readable yet all, because we are in a habit of reading the sizes in megabytes, gigabytes etc. as it makes very easy to understand and remember.
The df command provides an option to display sizes in Human Readable formats by using ‘-h’ (prints the results in human readable format (e.g., 1K 2M 3G)).
4. Display Information of /home File System
To see the information of only device /home file system in human readable format use the following command.
5. Display Information of File System in Bytes
To display all file system information and usage in 1024-byte blocks, use the option ‘-k‘ (e.g. –block-size=1K) as follows.
6. Display Information of File System in MB
To display information of all file system usage in MB (Mega Byte) use the option as ‘-m‘.
7. Display Information of File System in GB
To display information of all file system statistics in GB (Gigabyte) use the option as ‘df -h‘.
13. DU commands
du estimates and displays the disk space used by files.
Syntax
du [OPTION]... [FILE]...
du [OPTION]... --files0-from=F
To find out the disk usage summary of a /home/oracle/dir1/ directory tree and each of its sub directories. Enter the command as:
The output of the above command displays the number of disk blocks in the /home/oracle/dir1/ directory along with its sub-directories.
2. Using “-h” option with “du” command provides results in “Human Readable Format“. Means you can see sizes in Bytes, Kilobytes, Megabytes, Gigabytes etc.
3. To get the summary of a grand total disk usage size of an directory use the option “-s” as follows.
[root@tecmint]# du -sh /home/oracle/dir1/
4. Using “-a” flag with “du” command displays the disk usage of all the files and directories.
5. Using “-a” flag along with “-h” displays disk usage of all files and folders in human readeable format. The below output is more easy to understand as it shows the files in Kilobytes, Megabytes etc.
[root@tecmint]# du -ah /home/oracle/dir1/
6. Find out the disk usage of a directory tree with its subtress in Kilobyte blcoks. Use the “-k” (displays size in 1024 bytes units).
[root@tecmint]# du -k /home/oracle/dir1
7. To get the summary of disk usage of directory tree along with its subtrees in Megabytes (MB) only. Use the option “-mh” as follows. The “-m” flag counts the blocks in MB units and “-h” stands for human readable format.
[root@tecmint]# du -mh /home/oracle/dir1
8. The “-c” flag provides a grand total usage disk space at the last line. If your directory taken 674MB space, then the last
two line of the output would be.
9. The below command calculates and displays the disk usage of all files and directories, but excludes the files that matches given pattern. The below command excludes the “.txt” files while calculating the total size of diretory. So, this way you can exclude any file formats by using flag “-–exclude“. See the output there is no txt files entry.
10. Display the disk usage based on modification of time, use the flag “–time” as shown below.
14. FIND Command
Find searches for files in a directory hierarchy
The Linux find command is very powerful. It can search the entire file system to find files and directories according to the search criteria you specify. Besides using the find command to locate files, you can also use the command to execute other Linux commands (grep, mv, rm, etc.) on the files and directories you find, which makes find extremely powerful.
The find command is used to locate files on a Unix or Linux system. find will search any set of directories you specify for files that match the supplied search criteria. You can search for files by name, owner, group, type, permissions, date, and other criteria. The search is recursive in that it will search all subdirectories too. The syntax looks like this:
Syntax: find where-to-look criteria what-to-search
# find / -name test
By default it will show all the files and directories if we don’t specify the type option.
This will search the whole system for any files named test and display their pathnames. Here we are using the criterion ‑name with the argument test to tell find to perform a name search for the filename test. The output might look like this:
#find . -name test search under the current dir
If find doesn't locate any matching files, it produces no output.
You can specify as many places to search as you wish:
Using wildcard search
Searching for a directory using -type d
We can also use –type f to search for a file
case-insensitive searching
--------------------------
#find . -iname test
#find . -iname foo -type d # same thing, but only dirs
#find . -iname foo -type f # same thing, but only files
find files with different extensions
------------------------------------
find . -type f \( -name '*.trc' -o -name '*.trm' \)
find . -type f \( -name '*.sql' -o -name '*.sh' \)
find . -type f \( -name "*cache" -o -name "*xml" -o -name "*html" \)
find . -type f \( -name '*.txt' -o -name '*.ksh' \)
find files that don't match a pattern (-not)
--------------------------------------------
find . -type f -not -name "*.log" # find all files not ending in ".log”
find files and act on them (find + exec)
------------------------------------------------------
find /usr/local -name "*.html" -type f -exec chmod 644 {} \; # change html files to mode 644
find htdocs cgi-bin -name "*.cgi" -type f -exec chmod 755 {} \; # change cgi files to mode 755
find . -name "*.pl" -exec ls -ld {} \; # run ls command on files found
find and copy
-------------
find . -type f -name "*.mp3" -exec cp {} /tmp/MusicFiles \; # cp *.mp3 files to /tmp/MusicFiles
copy one file to many dirs
--------------------------
find dir1 dir2 dir3 dir4 -type d -exec cp header.shtml {} \; # copy the file header.shtml to those dirs
find and delete
---------------
find . -type f -name "Foo*" -exec rm {} \; # remove all "Foo*" files under current dir
find . -type d -name CVS -exec rm -r {} \; # remove all subdirectories named "CVS" under current dir
find files by modification time
-------------------------------
find . -mtime -1 # 24 hours
find . -mtime -7 # last 7 days
find . -mtime -7 -type f # just files
find . -mtime -7 -type d # just dirs.
No comments:
Post a Comment